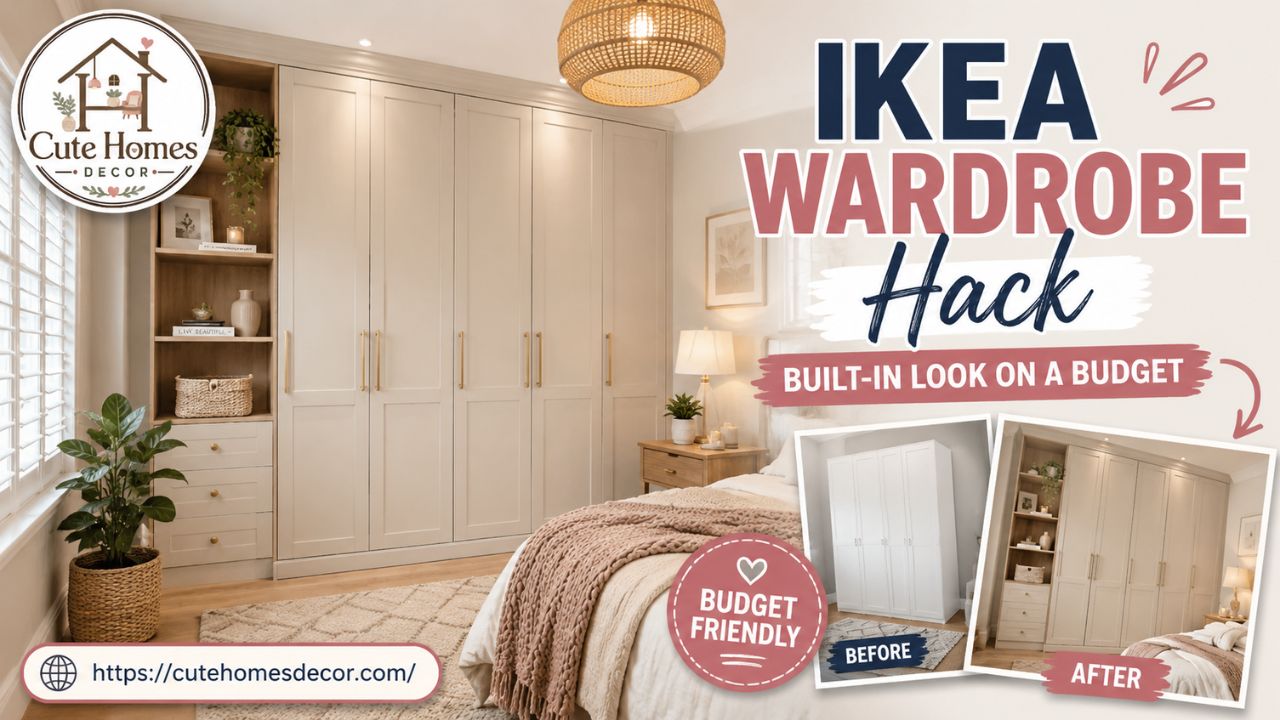
Thousands of pounds worth of joinery look — for a fraction of the price.
There’s a moment every homeowner knows: you walk into a beautifully styled bedroom on Instagram or in a showroom, and there it is — a wall of seamless, floor-to-ceiling fitted wardrobes that look like they were built specifically for that room. You check the price from a local joinery firm, and your heart sinks. We’re talking £3,000 to £8,000 for a decent set of custom-built wardrobes. But here’s the thing — a growing number of clever homeowners have figured out the secret, and it all starts with an IKEA fitted wardrobe hack.
The IKEA PAX wardrobe system has been around for decades, quietly sitting in flat-pack boxes in millions of homes. But when you know how to dress it up — with the right trim, the right technique, and the right interior choices — it transforms from a basic flat-pack unit into something that looks genuinely bespoke. Interior designers and clever DIYers across the UK and beyond have been doing this for years, and in this guide, we’re pulling back the curtain on every detail.
Whether you’re renting and working around limitations, or you own your home and want the premium look without the premium price tag, the IKEA built-in wardrobe hack could genuinely change your bedroom. Let’s walk through everything — from planning and buying to the finishing touches that make all the difference.

A well-executed IKEA PAX built-in hack creates a seamless, custom-built look from budget flat-pack units — floor to ceiling, wall to wall.
Why the IKEA PAX System Is the Foundation of Every Great Built-In Hack
Before we get into the how, it helps to understand why the IKEA PAX built-in approach works so well in the first place. The PAX frame is not glamorous. It’s essentially a white box — but it’s a very well-engineered white box. The shelving is sturdy, the frame measurements are standardised, and the range of compatible internal fittings, doors, and accessories is genuinely impressive.
The PAX system comes in a handful of widths (50cm, 75cm, 100cm) and heights (201cm and 236cm), which means it’s designed to flex across different room dimensions. In the UK, standard ceiling heights tend to hover around 240–250cm, which makes the 236cm units particularly popular for anyone attempting a floor-to-ceiling wardrobes IKEA look — with just a small filler panel or crown moulding needed to bridge the gap.
The real genius of the system — and why so many people turn it into a built-in PAX wardrobe — is that IKEA designed the PAX to be modular. You can stack units side by side, mix depths, and combine different door styles without visual inconsistency. That modularity is exactly what makes it hackable.
| 💡 PRO TIP Use IKEA’s free PAX planning tool online before you buy anything. You can design your entire wall of wardrobes digitally, see how the units fit together, and calculate exactly what you need — including internal fittings. |
The Key Measurements You Must Get Right
If you’re planning a DIY built-in wardrobes IKEA project, measurements are everything. Get them wrong and you’ll end up with awkward gaps, units that won’t close, or doors that drag on the carpet. Here’s what to measure before you do anything else:
- Floor-to-ceiling height — measure in at least three places (corners and centre), as floors and ceilings are rarely perfectly level
- Wall width — the total run of wall you want to cover, including any alcoves or chimney breasts
- Depth available — standard PAX units are 58cm deep; check there’s enough clearance with door swing and room layout
- Skirting board height — you may need to cut notches in the base of each unit or remove the skirting entirely
- Any obstructions — light switches, power sockets, radiators, or vents that need to be worked around
The IKEA PAX Hack Built-In: Step-by-Step From Flat Pack to Fitted Look
This is the part most guides skim over, so we’re going deep. The IKEA PAX hack built-in process has a handful of key stages, and each one builds on the last. Miss a step and you’ll notice it in the finished result.
Step 1 — Planning Your Layout and Choosing PAX Frames
Start by deciding how many units you need and in what configuration. A typical PAX built-in wardrobe for a UK master bedroom might use three or four units side by side, spanning a full wall. Mix widths strategically — wider units in the middle, narrower ones at the edges if you’re filling an awkward space.
The 236cm height is almost always the right choice for the built-in look. The 201cm units leave an obvious gap at the top that requires more work to disguise and can look like an afterthought. With the 236cm frame, you’re only bridging a small gap of 4–14cm depending on your ceiling, which is easy to hide with crown moulding or a simple filler board.
Step 2 — Preparing the Room and Installing the Frames
Before a single flat-pack box is opened, prep the room. Remove skirting boards along the wall where the wardrobes will sit — this allows the units to sit flush against the wall and floor. If you want to keep the skirting, you’ll need to cut notches in the base of each PAX frame (a jigsaw works well for this). Cutting skirting is the cleaner solution and the one most professional results are achieved with.
Assemble each PAX frame flat on the floor before standing it up — it’s much easier with a second pair of hands. Once upright, fix each frame to the wall using the supplied fixings and, crucially, fix adjacent frames to each other. This creates a single rigid structure rather than several wobbly individual units.
Crown moulding and MDF filler panels bridge the gap between the PAX frame and the ceiling — this single detail transforms the entire look from flat-pack to fitted.
Step 3 — How to Make IKEA PAX Look Built In: The Trim Technique
This is the single most important step in the whole process, and it’s where most IKEA PAX hacks either succeed or fall flat. The gap between the top of the units and the ceiling, the sides of the units and the walls, and the bottom and the floor — these are the tells. Address them properly, and the result is genuinely indistinguishable from bespoke joinery.
Here’s how to tackle each gap when learning how to make IKEA PAX look built in:
- Top gap: Cut a filler board (MDF works perfectly) to fit exactly between the top of the wardrobe frames and the ceiling. Paint it to match the frames and ceiling, then apply crown moulding or coving along the join. This single step does more for the built-in illusion than anything else.
- Side gaps: If there’s space between the end unit and the wall, fill it with an MDF panel cut to size. Scribe it to the wall if the wall is uneven. Finish with a thin strip of decorative moulding.
- Bottom: With skirting removed, the base of the unit should be flush with the floor. A thin bead of decorators’ caulk along the join and a painted skirting board reinstalled in front of the units completes the look.
“The difference between a wardrobe that looks like a piece of furniture and one that looks built in comes down to a few metres of MDF and trim. The materials cost almost nothing; the effect is priceless.”
Step 4 — Choosing the Right PAX Doors for the Built-In Effect
The door choice is critical for any IKEA PAX built-in wardrobe project. IKEA offers a wide range of compatible doors — from simple white panels to mirrored fronts and slatted wood designs. For the most convincing built-in look, there are a few rules of thumb to follow.
Hinged doors almost always look more custom than sliding doors. Sliding doors are practical in tight rooms, but the visible track at the top is a visual giveaway that these are flat-pack units. If you’re doing a serious IKEA PAX fitted wardrobe hack, hinged doors with simple, elegant hardware (think long bar handles in brushed brass or matt black) look significantly more expensive than they are. The PAX wardrobe doors range from IKEA pairs well with almost any interior style.
📊 IKEA PAX BUILT-IN HACK: AT A GLANCE
| £800 Avg. cost for a full PAX built-in wall (4 units) | £5,000+ Equivalent custom joinery cost from a professional | 2–3 Weekend days needed for a typical installation | 236cm Recommended PAX height for most UK rooms | 83% Of DIYers say trim moulding was the biggest visual upgrade |
Customising the Interior: Making PAX Work Harder for You
The outside might fool everyone, but a great IKEA built-in closet is also brilliant on the inside. The PAX internal fitting range — known as KOMPLEMENT — is extensive, and choosing the right combination of shelves, drawers, pull-out rails, and accessories makes a massive difference to how usable the finished wardrobe actually is.
Shelf and Rail Configurations That Actually Work
Don’t just buy a rail and a few shelves and call it done. Think about what you actually store, and configure each unit accordingly. A dedicated unit for long dresses and coats needs a full-height rail. A unit primarily for folded clothes and accessories is better with multiple shelves. A mixed configuration — with a rail at the top and drawers below — suits folded shirts and jeans.
The KOMPLEMENT pull-out trouser hanger is one of those fittings that sounds gimmicky but genuinely earns its place. Similarly, the PAX pull-out shoe shelf is ideal for keeping footwear visible and accessible without creating a jumbled pile at the bottom. When thinking about how to customise IKEA PAX, it helps to audit your wardrobe contents before you buy internal fittings — rather than buying a generic setup and adapting to it.
The IKEA PAX in an Existing Closet Alcove
If you have an existing recess or alcove in your bedroom — common in older UK properties, especially Victorian and Edwardian terraces — the IKEA PAX in existing closet approach is even more straightforward. The PAX frames slot neatly into an alcove, and the walls on three sides already do the work of making the units look fitted. All you need is the top trim and a good coat of paint, and the transformation is remarkable.
For alcove installations, take extra care to measure the depth of the recess, as older properties often have alcoves that aren’t perfectly square. If the depth is shallower than the standard 58cm PAX depth, IKEA also makes a 35cm depth frame — ideal for shallower recesses or for creating a PAX walk-in wardrobe within a larger room.
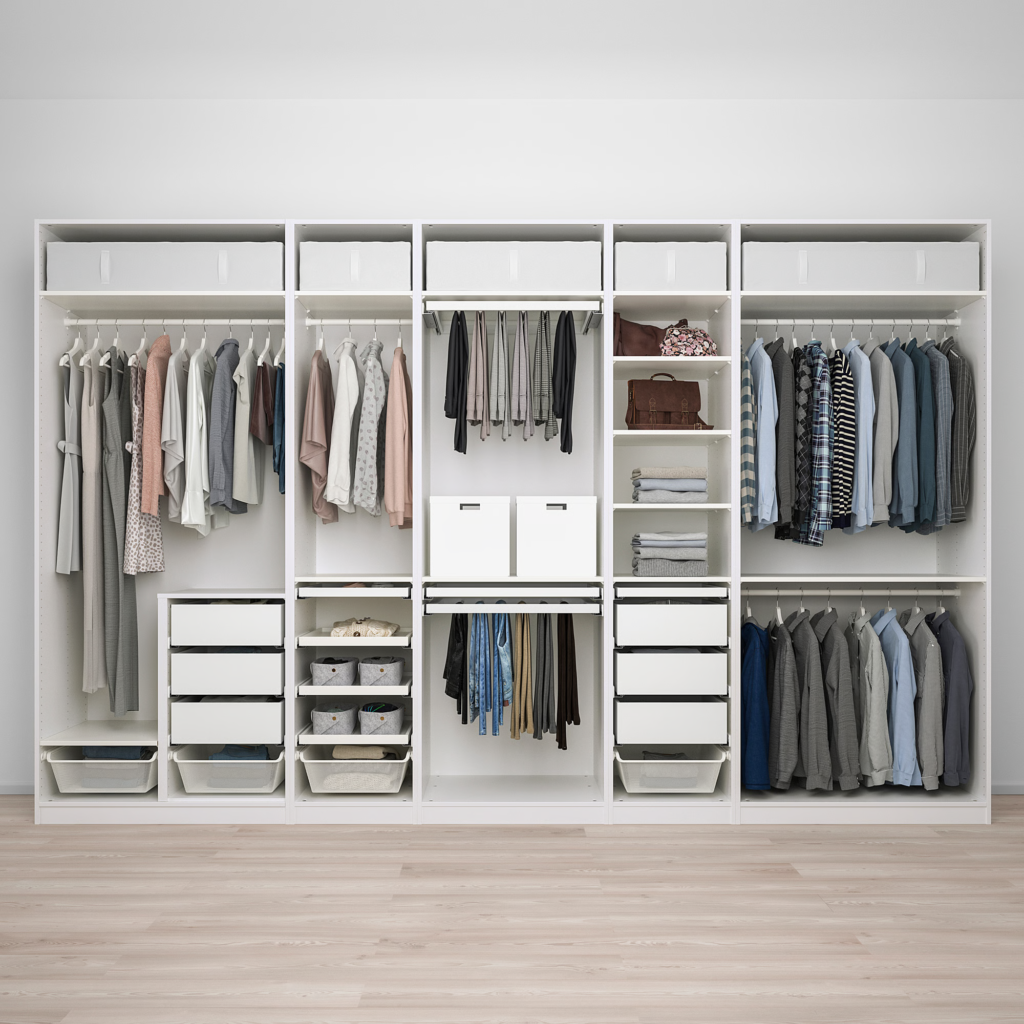
The KOMPLEMENT internal fitting range — shelves, drawers, pull-out rails — is what turns a basic PAX frame into a wardrobe that works as hard as it looks good.
Design Ideas for Your IKEA Wardrobe Hack: Styles That Actually Look Expensive
One of the most exciting aspects of the IKEA wardrobe hack world is the sheer range of aesthetic outcomes you can achieve with the same basic PAX frames. The box itself is neutral — what you put on it determines the style entirely. Here are some of the most popular and most convincing design directions.
The Classic White Shaker — Timeless and Always Elegant
IKEA’s AXSTAD and GRIMO door ranges deliver a clean, flat-fronted look. But for a genuine Shaker-style result, many people choose to fit third-party door fronts from companies like Superfront, Plykea, or Naked Doors — all of which make fronts designed specifically for the PAX system. Fitted with brass or black bar handles and painted in a soft neutral — think Farrow & Ball Pavilion Gray or Elephant’s Breath — this is the approach behind countless magazine-worthy bedroom transformations.
The beauty of this approach is that it gives you the look of a built-in wardrobe without being tied to IKEA’s door range at all. The frames provide the structure; the custom fronts provide the personality. It’s a genuinely clever hybrid of budget infrastructure and premium finish.
The Floor-to-Ceiling Mirror Wall
IKEA’s AULI and SVARTISDAL mirrored door options are a popular choice for smaller bedrooms, where reflecting light and creating a sense of space is as important as storage. The floor to ceiling wardrobes IKEA mirror approach works especially well in long, narrow rooms — the mirrors essentially double the apparent depth of the room and bounce light from windows across the space.
When paired with good top-fill trim and a continuous run of units across a full wall, mirrored PAX fitted wardrobes read as genuinely architectural rather than furniture. It’s a particularly popular choice for master bedrooms where the visual size of the room matters as much as the storage.
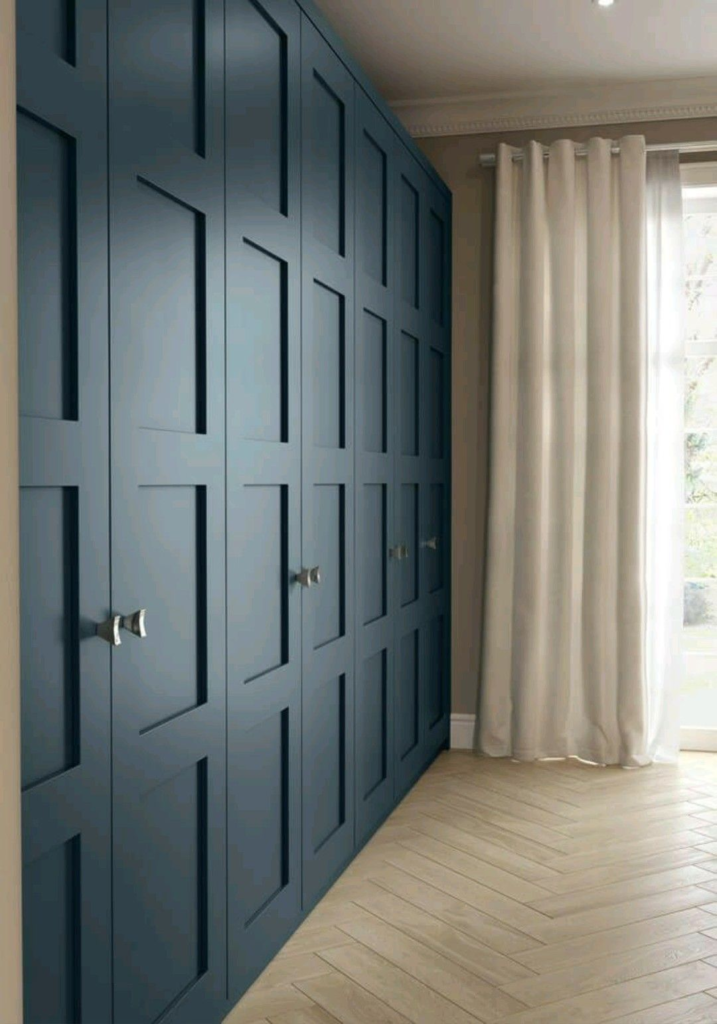
The Painted Bedroom IKEA PAX Hack
One of the most transformative and underused approaches in the bedroom IKEA PAX hack world: paint the entire wardrobe, including the trim, filler panels, and walls behind in the same colour. Deep, saturated tones — navy, forest green, charcoal, terracotta — work particularly well, and the effect of painting everything one continuous colour dissolves the distinction between furniture and architecture entirely.
This approach is especially effective for the IKEA built-in hack bedroom when you want a bold, boutique-hotel aesthetic. Paint the wardrobes, the surrounding walls, and even the ceiling in the same shade, and the wardrobes don’t read as wardrobes at all — they read as part of the room itself.
Common Mistakes to Avoid on Your IKEA PAX Wardrobe Hack
For all its accessibility, the IKEA PAX wardrobe hack does have its pitfalls — and most of them are avoidable if you know what to watch for. Here are the errors that come up most often, and how to sidestep them.
Skipping the Wall Fixing Stage
PAX frames that aren’t properly fixed to the wall are a safety hazard, not just an aesthetic problem. Always fix each frame to the wall using a stud finder to locate solid wood in the wall structure (in UK plasterboard walls, this is especially important). Also fix adjacent units to each other at multiple points — this creates one integrated, rigid structure that will stay put for years.
Underestimating the Importance of Level
Even a slight lean or tilt will be obvious once doors are fitted — they’ll swing open or shut on their own. Use a good spirit level throughout the installation, and shim the base of units where the floor is uneven. The PAX frame has a small amount of adjustability in its feet, which helps, but in older properties with distinctly unlevel floors, you may need to do more work at this stage.
Choosing the Wrong Paint Finish for the Trim
If you’re painting your filler panels and trim to match the PAX units, use a satinwood or eggshell finish rather than matte. The existing PAX surfaces have a slight sheen to them, and matte paint will look obviously different in certain lights. A water-based satinwood is the closest match to the standard IKEA white finish and is far easier to clean over time.
Forgetting About Ventilation and Electrics
If your IKEA wardrobe hack built-in will sit in front of a radiator, you’ll need to plan how to deal with heat circulation. Similarly, if there are power sockets on the wall that will be behind the wardrobes, decide early whether to move them or to cut access holes in the back of units. Attempting to retrofit these solutions after installation is significantly harder.
IKEA Wardrobe Hacks UK: Regional Considerations Worth Knowing
The IKEA wardrobe hacks UK community has developed some specific knowledge born from the quirks of British homes — and if you’re based in the UK, this is worth knowing before you start. Older UK properties often have walls that are far from perfectly straight or square. Victorian and Edwardian terraces in particular can have walls that bow, lean, or run at angles that would make a carpenter weep.
The key technique here is scribing — cutting the side panels of your fill pieces to exactly follow the contour of an uneven wall, rather than trying to force a straight piece against a curved surface. It requires a compass and a jigsaw, but the result is a gap-free, seamless finish that looks genuinely professional. Many experienced DIYers consider scribing the single skill that most separates a credible built-in finish from an obviously amateur one.
UK homes also commonly have dado rails, picture rails, or deep coving at ceiling level — all of which can complicate a full-height wardrobe installation. Plan how you’ll deal with these features before you start: remove them, work around them, or incorporate them deliberately into the design as decorative elements.
Budget Breakdown: What Does an IKEA Fitted Wardrobe Hack Actually Cost?
One of the most common questions around the IKEA fitted wardrobes hack approach is simply: what will it cost me? The honest answer is that it depends significantly on the scope of the project, the doors you choose, and whether you’re doing all the work yourself or hiring help for parts of it. But we can give you a realistic framework.
Typical Cost Breakdown for a 4-Unit PAX Built-In (UK, 2025)
- 4 × PAX frames (236cm): £260–£380 depending on width configuration
- PAX doors (IKEA range): £180–£400 depending on style and quantity
- Third-party custom door fronts: £300–£900 if choosing premium alternatives
- KOMPLEMENT internal fittings: £100–£250 depending on configuration
- MDF for fill panels and trim: £40–£80
- Moulding, caulk, fixings, paint: £30–£60
- Total DIY range: approximately £610–£1,170
- Equivalent custom-built joinery: £3,500–£8,000+
The saving is substantial. Even at the upper end of the IKEA hack budget, you’re spending a fraction of what a traditional joinery firm would charge for the same visual result. And unlike custom joinery, if you later want to reconfigure or move, the PAX units can be disassembled and reinstalled — something a fixed built-in wardrobe simply cannot offer.
| 💡 PRO TIP Check the IKEA ‘As-Is’ section in-store or the IKEA second-hand marketplace online. PAX frames in good condition regularly appear at significant discounts — people who moved house and couldn’t take them often sell for 40–60% of the original price. |
DIY Built-In Wardrobe Ideas Beyond the Standard PAX Wall
The standard approach — a run of PAX units across one wall — is tried, tested, and excellent. But the diy built-in wardrobe ideas landscape has expanded well beyond that basic configuration. Here are some creative variations that clever DIYers have developed.
The PAX Walk-In Wardrobe
If you have a spare bedroom, a large landing, or a generous en-suite space, the PAX walk-in wardrobe approach takes the same principles and applies them to a room-within-a-room concept. Units run along two or three walls, with a central island (often an ALEX unit repurposed as a freestanding dresser) and curtained or open access rather than doors.
The PAX Behind a Stud Wall
One increasingly popular approach in the UK is building a lightweight stud wall in a bedroom to create a dedicated dressing room area, then installing built-in IKEA pax units behind it. The stud wall has an opening — sometimes with a door, sometimes with a curtained arch — and the PAX units inside read as completely built-in because they’re enclosed within a dedicated space.
DIY Built-In Wardrobe Doors — Bespoke Fronts for the PAX Frame
For those who want genuinely unique diy built in wardrobe doors, making your own fronts for PAX frames is entirely possible. Router-cut MDF panels in a Shaker profile, solid timber frames with centre panels, or even reed-wrapped board fronts — all of these can be fitted to the PAX frame’s standard hinge points. It’s a step up in woodworking skill, but the results can be extraordinary.
Frequently Asked Questions
How do I make IKEA PAX look built in?
The key is filling all the gaps between the units and the walls, ceiling, and floor using MDF filler panels and decorative trim or crown moulding. Paint everything — units, panels, trim — in the same colour for a seamless, architectural finish. Fix the units properly to the wall and to each other so they form one rigid structure. This single approach answers how to make PAX look built in more effectively than any other technique.
Is the IKEA PAX wardrobe sturdy enough for a built-in installation?
Yes — when properly fixed to the wall and to adjacent units, the PAX system is very sturdy. The frame is made from particleboard with a melamine finish, which is standard for wardrobe furniture at this price point. Wall-fixing the units (using rawlplugs and screws into solid wall or studs) dramatically increases stability.
Can I use IKEA PAX in an existing alcove or closet?
Absolutely — and it’s actually easier in many ways. The IKEA PAX in existing closet approach means the walls on three sides already provide the built-in look. You mainly need to deal with the front face and the top gap. Just measure the alcove carefully, as older properties often have recesses that aren’t perfectly square.
What’s the best IKEA PAX door option for a fitted look?
Hinged doors generally look more custom than sliding doors because there’s no visible track at the top. Within the IKEA range, the GRIMO (frosted glass), AXSTAD, and HASVIK styles are popular for fitted hacks. Many people also choose third-party fronts from specialist companies for a fully custom finish. Consider PAX wardrobe doors in a Shaker style for a timeless, premium look.
How long does an IKEA PAX built-in hack take to complete?
A typical installation of 3–4 units, including fitting the frames, adding trim, and painting, takes most DIYers a full weekend — roughly 12–16 hours of work spread across two days. Adding custom internal fittings can add another few hours. Painting typically requires two coats with drying time between.
Do I need to remove skirting boards for a PAX built-in installation?
It’s strongly recommended. Removing the skirting boards and reinstalling them in front of the fitted units gives the cleanest, most professional result. Alternatively, you can notch the base of each PAX frame to accommodate existing skirting, but this is more complex and rarely looks as clean as starting fresh.
Can I take PAX built-in wardrobes with me if I move house?
Yes — one of the major advantages of the IKEA wardrobe hack built-in approach over true custom joinery is that it’s fully demountable. The units unscrew from the walls and from each other, the trim comes off with a knife and a bit of filler, and the whole installation can be packed down and moved. You’ll need to repaint and re-trim in the new property, but the frames and fittings travel with you.
What MDF thickness should I use for the filler panels and trim?
For vertical side filler panels, 18mm MDF is ideal — it’s stiff enough not to flex and takes paint beautifully. For top filler panels, 12mm is fine if supported properly. For trim and moulding, standard off-the-shelf architrave profiles from a builders’ merchant work very well and are inexpensive. Sand, prime, and paint in the same finish as your wardrobe doors for a seamless result.
Are there UK-specific considerations for IKEA PAX wardrobe hacks?
Yes — UK homes, particularly Victorian and Edwardian properties, often have uneven walls, sloping floors, dado rails, and coving that all affect the installation. Scribing (cutting panels to match an uneven wall profile) is a technique worth learning for UK installs. Also note that UK ceilings vary: standard new-build heights of around 240cm work perfectly with 236cm PAX frames and a small filler strip, while older properties with higher ceilings may need more significant top-fill panels.
| Start Your IKEA Fitted Wardrobe Hack This Weekend What started as a budget necessity has become one of the most satisfying home projects a homeowner can take on. The IKEA fitted wardrobe hack — specifically the IKEA PAX built-in hack — is the rare DIY project where the result genuinely exceeds all expectations, and where the gap between the effort invested and the transformation achieved is as wide as it gets. Whether you’re after a classic white Shaker finish, a dramatic painted wall of built-in wardrobes, or a customised walk-in dressing room, the PAX system gives you the canvas. The trim, the doors, and the interior fittings give you the art. And the money you save over a traditional joinery quote? That’s the real bonus. 📐 Download the Free PAX Planning Checklist → |