From Field to Pantry — The Complete Grower’s Guide
There is something deeply satisfying about pulling a bulb of garlic out of the earth — that earthy smell, the papery skin still holding dirt, the weight of months of patient growing resting in your palm. But here is what most new growers discover the hard way: the moment you pull it up, your work is only half done. Harvesting garlic correctly is the first step; what happens over the next three to four weeks — the curing, the drying, the storing — determines whether your harvest lasts a few weeks or a full year.
| A Grower’s Hard Lesson “I lost almost forty pounds of hardneck garlic my first season — not because I grew it wrong, but because I stored it wrong. It turned soft and moldy within a month. That mistake taught me more about garlic than any book ever could.” |
Whether you’re a home gardener with a twenty-square-foot patch or a small-scale market farmer managing hundreds of row feet, the principles of curing garlic and drying garlic are the same. Get them right and you’ll have plump, pungent, perfectly preserved bulbs sitting in your kitchen through the dead of winter.
This guide walks you through every stage — from reading the signs that tell you harvest garlic is ready, to the exact steps for how to dry garlic bulbs properly, to troubleshooting the most common garlic curing problems that plague even experienced growers. Let’s dig in.
When Do You Harvest Garlic? Reading the Field Signs
Timing is everything with garlic, and the difference between pulling it one week too early versus one week too late can cost you months of storage life. The most reliable signal is the leaves — or more specifically, the green ones versus the brown ones.
The Leaf-Count Method
Each leaf on the garlic plant above ground corresponds to a wrapper layer around the bulb below ground. When the lower leaves dry out and turn brown, those wrappers have done their job. A rule of thumb used by experienced growers: when do you harvest garlic? When roughly half the leaves are still green and half have turned brown. This sweet spot means the bulbs have fully sized up, but the remaining green leaves will dry into protective paper wrappers during curing.
If you wait too long and most leaves are brown, the wrappers will be too thin and fragile — the cloves may even begin to separate from the bulb, making storage much harder. Pull too early, and the cloves haven’t reached their full size or developed enough papery skin to protect them.
| Grower’s Tip Dig a test bulb before making your final call. If the cloves fill out the skin snugly and the skin is starting to dry, you’re ready. If there’s still slack or the skin looks translucent and wet, give it another week. |
Softneck vs. Hardneck: Does Variety Change the Timing?
Yes — slightly. Softneck varieties (like Artichoke and Silverskin types) tend to mature a bit later and have more wrapper layers, making them more forgiving if you’re a day or two late. Hardneck varieties (Rocambole, Purple Stripe, Porcelain) mature earlier and have fewer, thinner wrappers — so they need to come out of the ground on time, and the curing garlic after harvest process becomes especially critical to protect them.
Knowing exactly when to pull your garlic — reading the green-to-brown leaf ratio — is the single most important decision in the entire growing season.
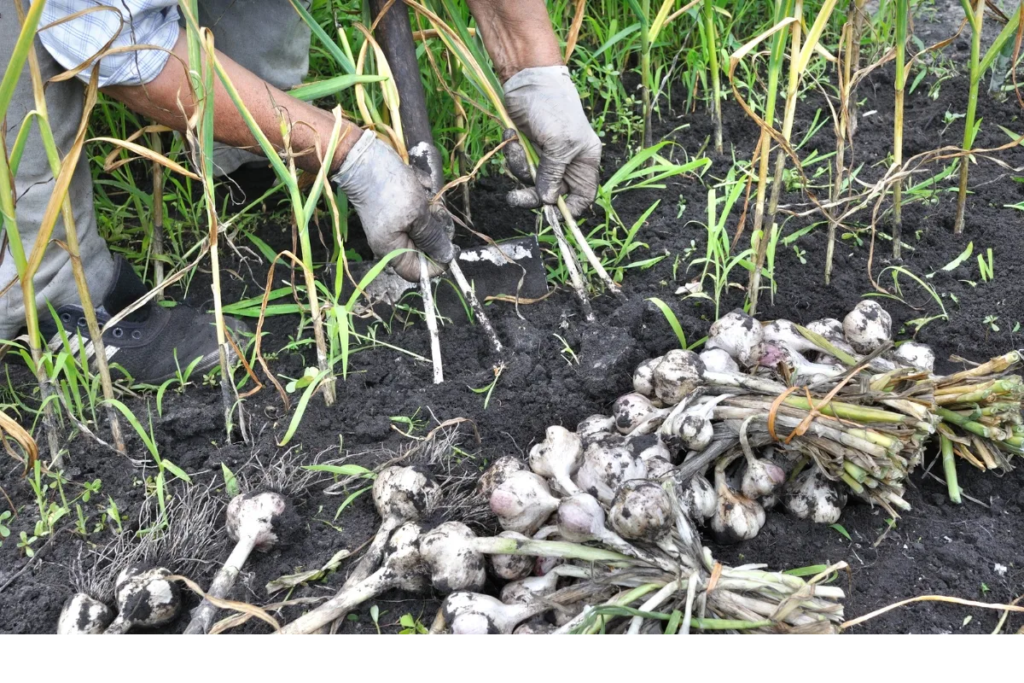
How to Harvest Garlic Without Damaging Your Bulbs
This part surprises many beginners: you should never yank garlic straight out of the ground by the stalk. The necks are fragile, and a broken neck will dramatically shorten storage life. The proper approach to how to harvest garlic starts six to eight inches away from the plant. Push a garden fork or flat spade into the soil at that distance, then lever it gently to loosen the earth around the bulb.
Tools and Technique
- Garden fork: Best for clay or compacted soils where bulbs grip tight.
- Flat spade: Works well in loose, well-amended beds.
- Hands-only: Fine in very sandy, raised-bed soils where the root structure is minimal.
How to Clean Garlic After Harvest
Right after pulling, shake or brush off the loose soil — but do not wash the bulbs. Water is the enemy at this stage. How to clean garlic after harvest properly means dry-cleaning only: a soft brush, a gloved hand, or a gentle knock against a boot to dislodge clumps. Leave the roots and tops attached. You’ll trim them later — after curing — not now.
| Common Mistake Never pile freshly harvested garlic in a closed bin or bag, even for an hour. Heat and trapped moisture build rapidly, creating perfect conditions for mold. Lay bulbs in a single layer in an open crate or hang them immediately. |
What to Do With Garlic After Harvest: The Curing Window
What to do with garlic after harvest is a question that has one non-negotiable answer: cure it. Immediately. And properly.
What Is Curing Garlic and Why Does It Matter?
Curing garlic is the process of drying the entire plant — roots, neck, wrappers, and bulb — in a warm, well-ventilated space until the outer layers transform into the dry, papery skin that acts as a natural protective shell. Without this process, the bulb’s moisture content stays too high, creating an environment where pathogens thrive.
Think of curing like tanning leather. The raw hide is soft and perishable; the cured hide is tough and lasting. Raw garlic pulled fresh from the soil is moist and vulnerable. Properly cured garlic is shelf-stable for months — sometimes up to a year or more for the right varieties stored in the right conditions.
THE GARLIC POST-HARVEST PROCESS — AT A GLANCE
| 01 Harvest | Pull when half the leaves are brown. Loosen soil first. Never yank by stalk. |
| 02 Dry-Clean | Brush off soil only. No water. Leave roots and tops on for now. |
| 03 Cure | Hang in bundles or lay flat. 70-80°F, good airflow, out of direct sun. 3-8 weeks. |
| 04 Trim & Grade | Cut roots to 1/2 inch, tops to 1 inch. Remove damaged outer wrappers. |
| 05 Store | Cool (50-65°F), dry, dark, with good airflow. Mesh bags or open crates. |
How to Cure Garlic: Step-by-Step
The mechanics of how to cure garlic are simple, but the details matter. Follow these steps and you’ll dramatically extend the life of your harvest.
Step 1 — Choose Your Curing Space
You need a spot that is warm (ideally 70-80°F / 21-27°C), dry, and well-ventilated. Airflow is far more important than temperature. A covered barn, a shaded greenhouse, a garage with windows open, or even a breezy porch all work well. What doesn’t work: a sealed shed in high humidity, a basement with no air movement, or direct outdoor sun.
Step 2 — Hanging Garlic to Dry
Hanging garlic to dry is the method preferred by most serious growers. When you bundle 8-12 plants together and hang them upside-down, gravity helps moisture move from the bulb outward through the neck and foliage. Air circulates around all sides of the bulb simultaneously, leading to more even curing than flat-laying allows.
Bundle the plants loosely using twine or a rubber band around the stalks. Don’t pack them tightly — each bundle needs air moving through it. Hang the bundles from a rafter, a dowel rack, a clothes drying bar, or even a taut wire strung across the space.
Step 3 — Flat-Drying as an Alternative
If hanging isn’t practical, drying garlic on flat racks or screens works well. Lay bulbs in a single layer on wire mesh or slatted wood with spacing for airflow. Flip them every few days so different surfaces are exposed to moving air.
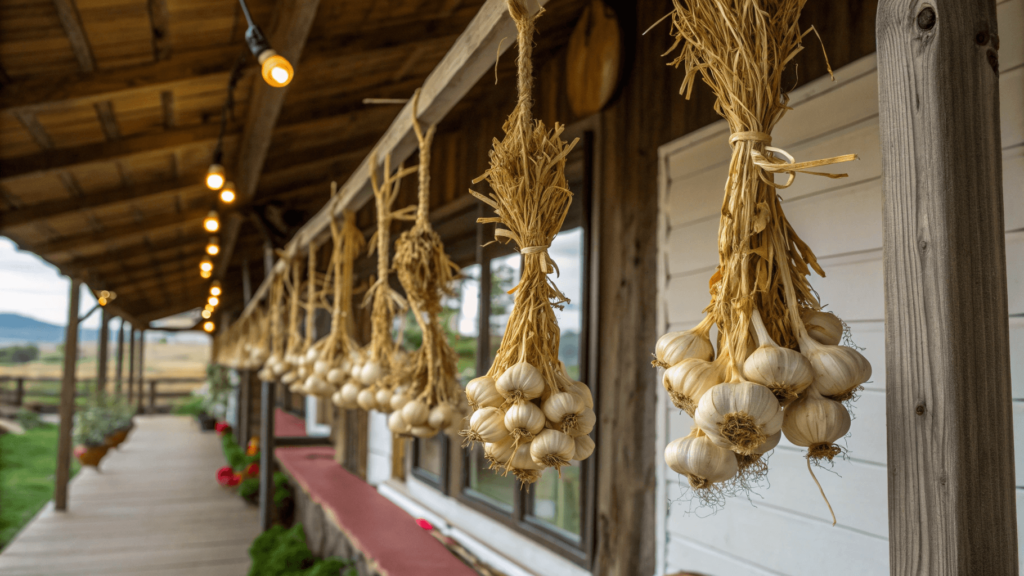
Hanging garlic to dry in loose bundles of 8–12 plants is the gold standard — gravity pulls moisture out through the neck while air circulates freely around every bulb.
How Long to Cure Garlic: Timelines by Variety
How long to cure garlic depends on the variety, the humidity in your curing space, and the size of the bulbs.
General Timeline for Drying Garlic After Harvest
- Softneck varieties (Artichoke, Silverskin): 3-4 weeks under good conditions.
- Hardneck varieties (Rocambole, Porcelain, Purple Stripe): 4-6 weeks due to fewer wrapper layers and higher initial moisture.
- Elephant garlic: Up to 8 weeks — the large bulbs hold much more moisture.
How long to dry garlic is ultimately something your senses will tell you. Run your fingers over the outermost wrapper. It should feel completely dry and papery — like a brown paper bag. The neck should be hard and stiff with no trace of give or dampness when squeezed. The roots should be bone dry and brittle.
| Time Check When in doubt, cure for an extra week. Under-cured garlic almost always fails in storage. Over-cured garlic — as long as conditions weren’t too hot — is perfectly fine. |
How to Dry Garlic: Deeper Techniques and Variables
Understanding how to dry garlic well means understanding what you’re actually trying to accomplish physiologically. Freshly harvested garlic bulbs contain an average water content of around 60-65%. Curing and drying garlic bulbs brings that content down to roughly 35-40%, creating conditions where natural antimicrobial compounds become concentrated enough to inhibit decay organisms.
Temperature and Humidity Targets
The ideal conditions for drying garlic after harvest:
- Temperature: 70-80°F (21-27°C). Higher temperatures speed drying but can damage volatile flavor compounds.
- Relative humidity: 40-60%. Above 70% RH, mold becomes a serious risk.
- Airflow: Continuous, gentle air movement. A fan on low speed can cut curing time by up to a third.
- Light: No direct sunlight. UV exposure bleaches wrappers and heats bulbs unevenly.
How to Dry Garlic After Harvest in Humid Climates
Growers in humid regions face an extra challenge. How to dry garlic after harvest when ambient humidity is already high: indoor curing with a dehumidifier running nearby is highly effective. Some growers in particularly wet climates use a low-temperature food dehydrator at around 95°F/35°C to move the initial bulk moisture out within the first 48-72 hours, then switch to conventional hanging for the remainder of the cure.
How to Process Garlic After Curing: Trimming, Grading, and Cleaning
Once your garlic has fully cured, how to process garlic before storage is a quick but important step.
Trimming the Roots and Tops
- Roots: Trim with sharp scissors to about 1/2 inch (1.25 cm). Cutting too close to the basal plate risks nicking the plate itself.
- Tops (softneck varieties): Cut to about 1 inch (2.5 cm) above the bulb, or braid before storing.
- Tops (hardneck varieties): Cut the rigid stem 1-2 inches above the bulb.
Cleaning the Wrappers
The outermost wrapper layer can be slightly discolored from weather exposure. Gently remove one or two outermost layers of papery skin — but never go past a solid, firmly attached layer. The remaining wrappers are your bulb’s armor; stripping too many away shortens storage life significantly.
How to Store Garlic After Harvest: Making It Last
How to store garlic after harvest comes down to four key variables: temperature, humidity, airflow, and darkness.
The Ideal Storage Environment
- Temperature: 50-65°F (10-18°C). Room temperature is acceptable but reduces storage life by 30-40%.
- Humidity: 45-55% RH. Too dry and cloves desiccate; too moist and mold returns.
- Airflow: Mesh bags, braided strands, slatted crates — anything that lets air move around each bulb.
- Light: Dark or dim conditions. A pantry or root cellar is better than a countertop in a sunny kitchen.
Storage Life by Variety
- Softneck garlic: Up to 9-12 months under ideal conditions.
- Hardneck garlic: 4-6 months at best — better used within the first half of the year.
- Elephant garlic: 4-5 months; the large bulbs dry out faster in storage.
| Pro Storage Tip For the longest possible storage, select your largest, most perfect bulbs to set aside as seed stock for next season. Save the smaller or slightly imperfect bulbs to use first — they won’t last as long in any case. |
Garlic Curing Problems: Diagnosis and Fixes
Garlic curing problems fall into a handful of recognizable patterns — and most of them are fixable if you catch them early.
Problem: Soft or Spongy Bulbs After Curing
This typically means the garlic wasn’t fully cured before the humidity rose, or it was harvested too late with damaged wrappers. Solution: increase airflow dramatically and consider moving bulbs indoors with a dehumidifier. Those bulbs should be used immediately or processed into garlic powder.
Problem: Mold on the Outer Wrappers
Surface mold on the dry outer wrappers is usually not a death sentence. Carefully peel away the affected wrappers and inspect the next layer. If the inner wrappers are dry and mold-free, the bulb is still good. If mold has penetrated to the cloves, discard that bulb entirely.
Problem: Garlic Sprouting During Curing
Sprouting during the curing phase means temperatures got too low (below 50°F) or conditions were inconsistent. Sprouted garlic is still perfectly edible and flavorful — just prioritize those bulbs for the kitchen rather than storage.
Problem: Wrappers Splitting or Peeling Away
This is a sign that humidity during curing was too low, the garlic was left in direct sun, or curing ran too hot. The cloves are fine, but stripped wrappers mean shorter storage life — use those bulbs first.
Problem: Neck Feels Soft When Squeezed
A soft or rubbery neck after several weeks of curing means the interior hasn’t fully dried. This is most common in hardneck varieties with thick stems. Extend the curing time and improve airflow before moving to storage.
Frequently Asked Questions
| When do you harvest garlic — what’s the most reliable sign? |
| The most reliable indicator is leaf count: harvest garlic when roughly half the leaves are still green and half have dried and turned brown. Each leaf corresponds to a wrapper layer. Dig a test bulb a week before you think it’s ready to confirm sizing. |
| How long does drying garlic after harvest actually take? |
| Drying garlic after harvest typically takes 3-6 weeks for most common varieties, though elephant garlic can take up to 8 weeks. Softneck varieties generally cure in 3-4 weeks; hardneck varieties need 4-6 weeks. Always test the neck for firmness before declaring the cure complete. |
| What’s the difference between curing garlic and drying garlic? |
| Curing garlic describes the transformation — the conversion of the fresh plant into a shelf-stable bulb. Drying garlic describes the physical mechanism — the removal of excess moisture. In practice, growers use both terms interchangeably. |
| Can I skip curing and use garlic straight from the garden? |
| Fresh-from-the-garden green garlic is a treat many chefs prize for its milder flavor. But if you want to store garlic after harvest for longer than a week or two, curing is non-negotiable. Uncured garlic will begin to mold within days in most home storage conditions. |
| Is hanging garlic to dry better than laying it flat? |
| Hanging garlic to dry in bundles is generally preferred because it allows air to circulate around all sides of the bulb simultaneously and uses gravity to help moisture migrate outward. Flat-drying on screens is an effective alternative — just flip bulbs every few days. |
| How do I know when curing garlic is complete? |
| Use three physical tests: (1) the outer wrappers should feel completely dry and crisp like paper; (2) the neck should be fully hard and stiff when squeezed; (3) the roots should be dry, brittle, and snap rather than bend. If all three are met, your curing garlic after harvest is complete. |
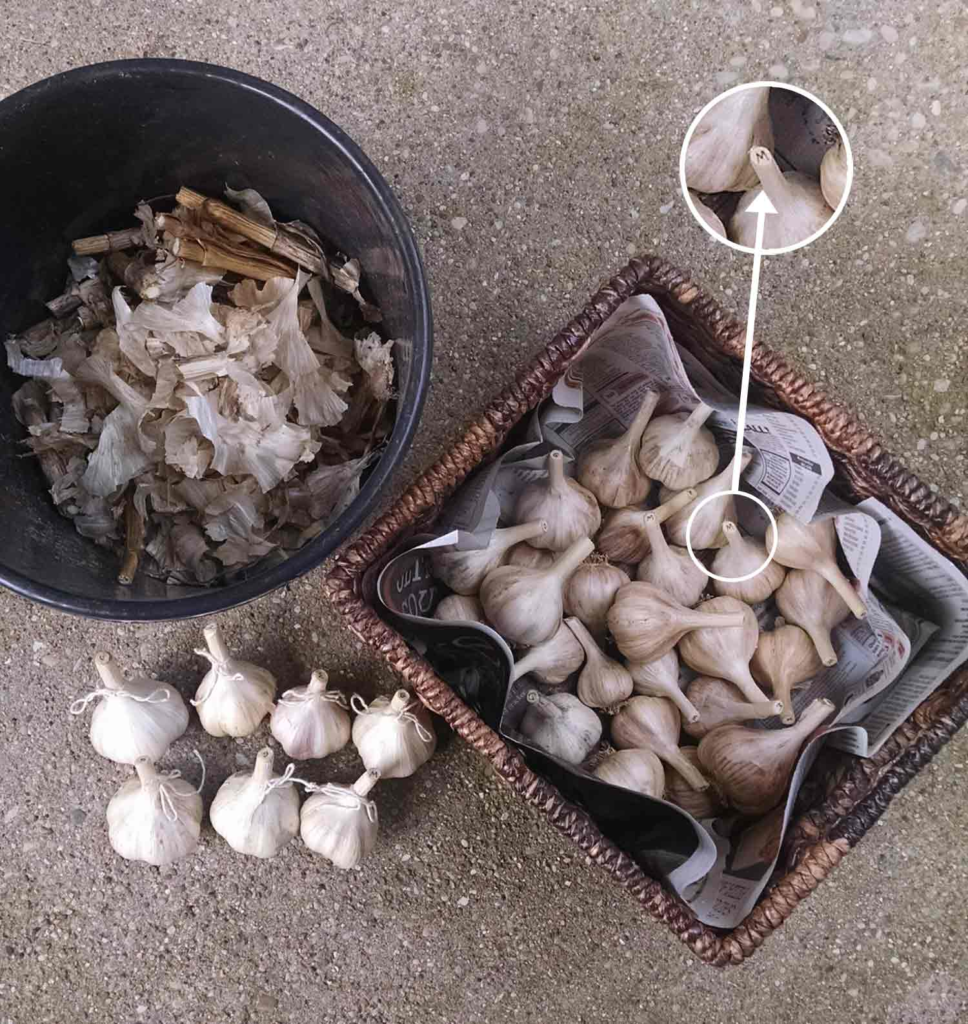
This is what success looks like — fully cured garlic with tight, bone-dry papery wrappers, a stiff neck, and crisp brittle roots. These bulbs are ready for trimming and long-term storage.
| What’s the best way to store garlic after harvest for maximum shelf life? |
| The ideal storage is a cool (50-65°F), dark, dry environment with good airflow — a root cellar, an unheated basement, or a cool pantry. Mesh bags or open-weave baskets are ideal. Avoid sealed plastic bags and refrigerators for whole uncured bulbs. |
| How do I handle garlic curing problems if mold appears? |
| Peel back the affected outermost wrapper and check the layer beneath. If it’s dry and mold-free, wipe gently with a dry cloth and return to a better-ventilated spot. Increase airflow immediately — a fan running continuously is the single most effective intervention for most garlic curing problems. |
| Can I cure garlic indoors if I don’t have a barn or shed? |
| Yes — many urban growers successfully cure garlic in apartments and houses. A spare bedroom with good cross-ventilation, a utility room with an open window, or a well-ventilated closet with a small fan can work. The key is airflow and warmth. |
| How do I clean garlic after harvest without using water? |
| How to clean garlic after harvest properly means dry-cleaning only: use a soft brush, a gloved hand, or gently knock the bulb against your boot to dislodge clumps of soil. Never wash garlic before curing — wet bulbs sitting in damp conditions will begin to mold within days. |
| Conclusion: The Harvest Is Just the Beginning Pulling garlic from the ground feels like the finish line — but every experienced grower knows it’s really just the start of a second, equally important phase. Harvesting garlic with good timing and gentle technique sets the foundation. But it’s the weeks of careful curing, proper drying, and thoughtful storage that transform that fresh bulb into something your pantry will thank you for all winter long. The core lessons: pay attention to your leaf count when deciding when to harvest garlic, prioritize airflow above all else during the curing phase, and give your garlic enough time to fully dry before trimming and storing. These aren’t complicated techniques — they’re the result of thousands of years of agricultural wisdom, refined and passed down through growers who couldn’t afford to lose a harvest. Ready to put this into practice? Walk out to your garden, count those leaves, and dig that first test bulb. Your harvest is waiting. |