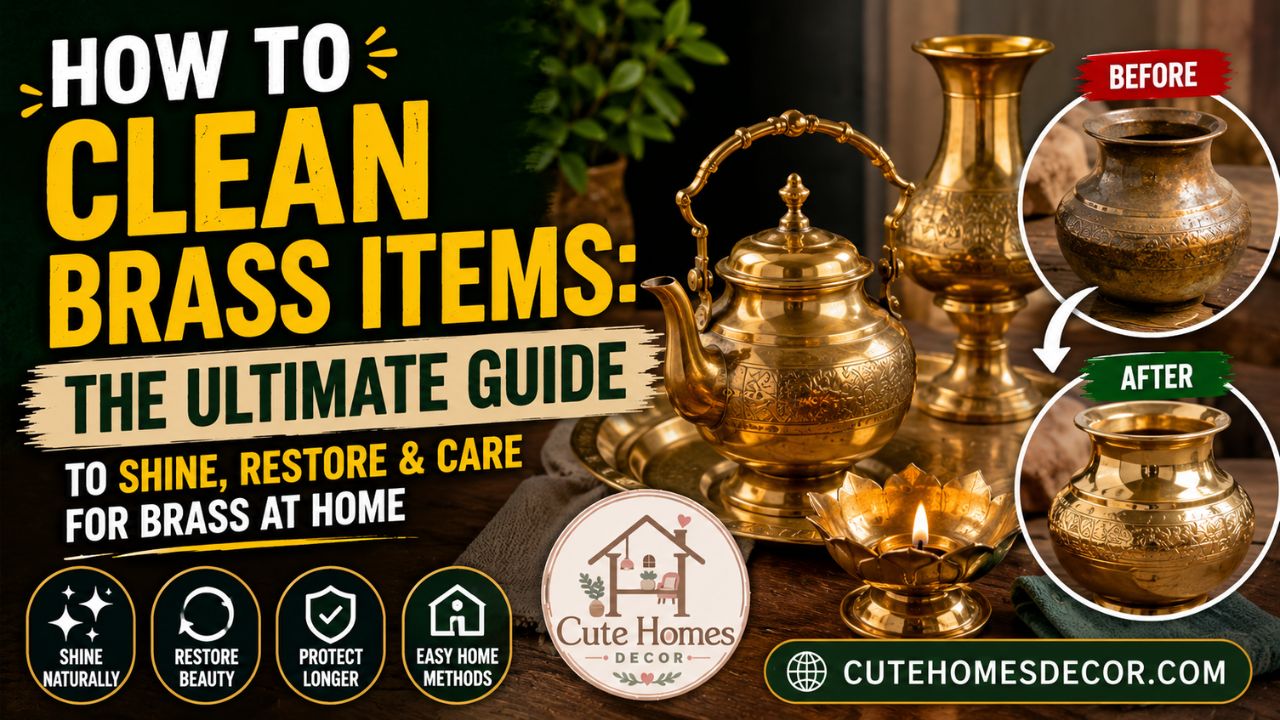
There is something deeply satisfying about picking up a dull, darkened brass piece and watching it transform back to a warm, golden glow right before your eyes. If you have ever wondered how to clean brass items without spending a fortune on professional services or harsh chemical products, you are in exactly the right place. From antique candlesticks passed down through generations to modern door handles losing their sheen, brass is everywhere in our homes — and it deserves proper care.
Brass is a beautiful metal alloy made of copper and zinc. Over time, exposure to air, moisture, and everyday handling causes it to oxidize and develop what is known as tarnished brass — that familiar dark, greenish, or brownish discoloration that makes once-gleaming objects look worn and neglected. The good news? You do not need a professional restorer or expensive products. Most solutions are already sitting in your kitchen.
This guide walks you through everything you need to know: from identifying real brass versus plated brass, to choosing the best natural and commercial methods to clean brass at home, to caring for your pieces so they stay brilliant for years. Whether you are dealing with old brass figurines, heavily corroded brass fixtures, or simply want to restore brass hardware to its original beauty, this is your complete playbook.
Common kitchen ingredients like lemon, vinegar, and salt are among the best ways to clean brass at home.
Understanding Brass: What You Are Really Working With
Before you reach for the cleaning cloth, it helps to understand what makes brass so unique — and why it tarnishes the way it does. Brass is not a pure metal; it is an alloy, typically composed of around 67% copper and 33% zinc, though the ratio varies. This composition gives brass its distinctive warm golden color and makes it slightly softer than pure metals, which means it can scratch if you are not careful during cleaning.
Real Brass vs. Brass-Plated Metal
One of the most important steps before you begin any cleaning is figuring out whether you are dealing with solid brass or a brass-plated item. This distinction matters enormously because the cleaning approach differs significantly.
Here is a quick test: hold a magnet up to the piece. Solid brass is not magnetic, so if the magnet sticks, you are working with a plated item (usually steel or zinc beneath the brass coating). For brass-plated pieces, you must be much gentler — aggressive cleaning can strip the thin brass layer completely, leaving you with bare, discolored metal underneath.
What Causes Brass Tarnish?
Brass tarnish is the result of a chemical reaction between the copper in the alloy and oxygen in the air, forming copper oxide on the surface. Over time, moisture, salts from fingerprints, and environmental pollutants accelerate this process, creating what we see as that characteristic dark, dull finish. The brass tarnish color typically progresses from a slight dimming of the gold tone, through yellow-brown patches, into deep brown, and eventually greenish-black in cases of severe brass oxidation.
In some collector and antique circles, a naturally developed patina on old brass is actually considered desirable. It signals age and authenticity. However, for most household items, removing that tarnish and restoring brass to a clean, bright finish is the goal.
How to Test If Your Brass Needs Cleaning
Not all brass that looks dark actually needs stripping back. Before you start scrubbing, ask yourself a few questions. Is this an antique piece where the patina adds value? Is the discoloration surface-level or deeply pitted? Understanding the condition of your piece helps you choose the right approach and avoid over-cleaning.
💡 Quick Tip If you have a piece with sentimental or monetary antique value, consult a professional restorer before attempting any home cleaning. Aggressive polishing can permanently reduce the value of genuine antiques by removing original patinas.
Identifying the Level of Tarnish
- Light tarnish: A slight dulling of the surface. Easy to reverse with mild cleaners.
- Moderate tarnish / dull brass: Yellow-brown discoloration across most of the surface. Responds well to natural acids like lemon or vinegar.
- Heavy tarnish / tarnished brass: Dark brown or near-black coating. May require a commercial brass cleaner or repeated treatments.
- Corrosion / brass oxidation: Greenish spots or pitting. Indicates deeper chemical changes. Requires more intensive treatment.
- Black spots on brass: Often a sign of heavy oxidation or contact with certain chemicals. Can usually be treated at home but may require patience and multiple applications.
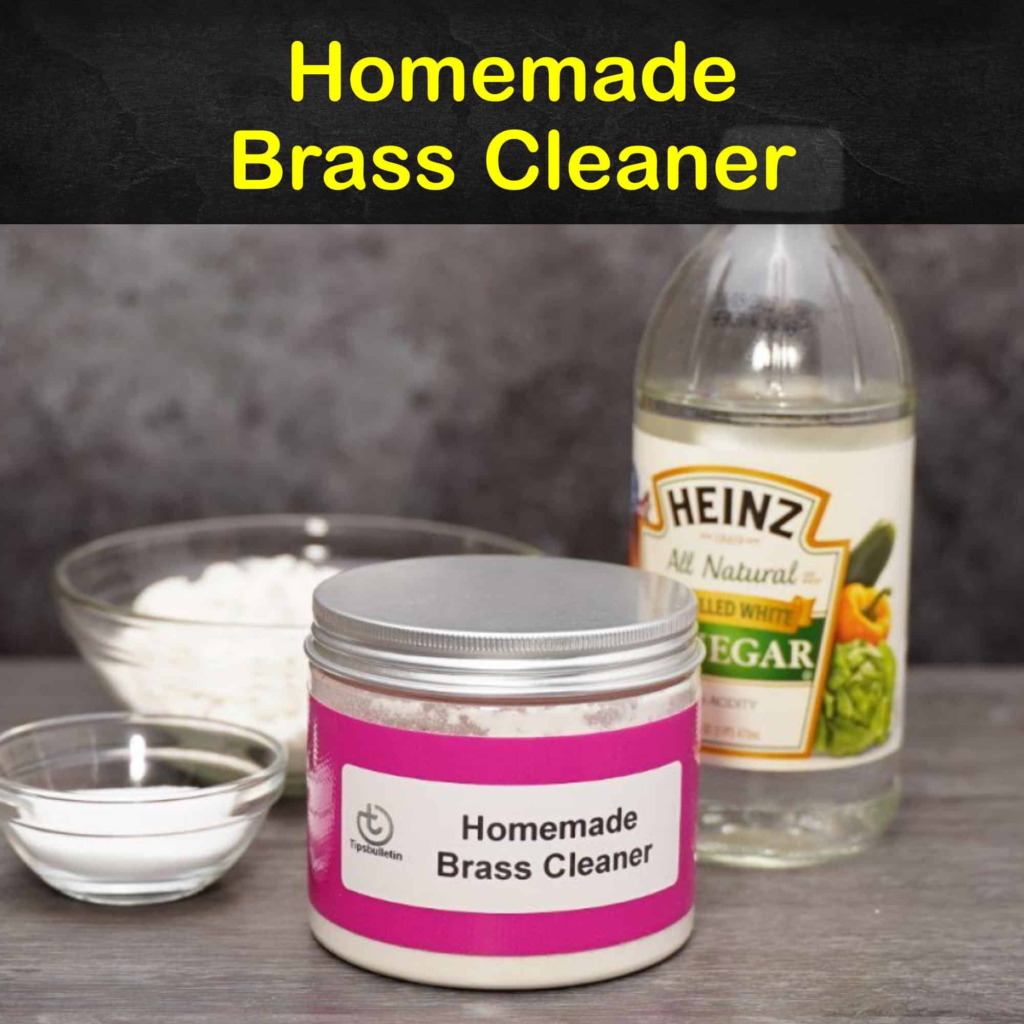
How to Clean Brass at Home Using Natural Methods
The beauty of cleaning brass at home is that you likely have everything you need in your pantry right now. Natural acids are remarkably effective at dissolving the copper oxide layer that causes tarnishing, and they are gentle enough for most brass pieces when used correctly. Let us walk through the most trusted, time-tested methods for how to polish brass at home.
✨ Natural Brass Cleaning Methods at a Glance
🍋Lemon + SaltCut lemon, dip in salt, rub directly. Best for moderate tarnish.
🧮Vinegar + Salt + FlourMakes a paste. Excellent for deep, even coverage on larger pieces.
🥣KetchupTomato’s natural acids work slowly but gently on light tarnish.
🧸ToothpasteMild abrasive for small items. Use plain white paste, not gel.
🥥Baking Soda + LemonGentle fizzing action lifts tarnish on delicate or vintage brass.
💧Dish Soap + Warm WaterRoutine maintenance for lightly soiled or lacquered brass.
Method 1: Lemon and Salt — The Classic Way to Shine Brass
This is arguably the most popular method for how to shine brass at home, and for good reason. The citric acid in lemon juice reacts with copper oxide to dissolve tarnish, while salt provides gentle abrasive action to lift away residue. To shine up brass using this method, simply cut a lemon in half, sprinkle a generous amount of table salt on the cut face, and rub it directly onto the brass surface in circular motions. Let it sit for a minute or two, then rinse with warm water and buff dry with a soft cloth.
For smaller items, you can squeeze the lemon juice into a bowl, add a teaspoon of salt, and soak the piece for 10–15 minutes before scrubbing gently with an old toothbrush. This technique works brilliantly for brass figurines, small decorative items, and brass hardware.
Method 2: White Vinegar, Salt, and Flour Paste
When you want to make brass shine on larger pieces like brass furniture or decorative panels, this classic paste works wonders. Mix together one teaspoon of table salt, half a cup of white vinegar, and enough flour to create a thick paste (roughly 1–2 tablespoons). Apply the paste evenly across the surface, leave it for 10–30 minutes depending on the severity of the tarnished brass, then rinse thoroughly with warm water and dry immediately. The combination of acidic vinegar, abrasive salt, and binding flour creates a DIY brass cleaner that rivals many commercial products.
⚠ Important Warning Always rinse brass thoroughly after using acidic cleaners. Leaving acid residue on the surface can accelerate future tarnishing and cause uneven discoloration over time.
Method 3: Tomato Ketchup for Light Tarnish
This might sound strange, but ketchup is a surprisingly effective way to clean tarnished brass with minimal effort. The acetic acid in tomatoes gently dissolves light tarnish without being aggressive enough to damage delicate finishes. Apply a thin layer of plain ketchup to the stained brass, leave it for 30 minutes to an hour, then wipe clean with a damp cloth and dry thoroughly. It is not the fastest method, but it is one of the gentlest — ideal for lightly discolored brass or pieces you are nervous about over-cleaning.
Method 4: Can You Use Toothpaste to Clean Brass?
Yes — and it actually works quite well. Plain white toothpaste contains mild abrasives that are effective at removing surface tarnish. Will toothpaste clean brass? Absolutely, especially for small items like brass figurines, buckles, or jewelry. Apply a small amount of toothpaste to a soft cloth or old toothbrush, scrub in circular motions, then rinse with warm water and dry completely. Avoid gel toothpastes and whitening formulas, as these may contain ingredients that could damage the brass surface.
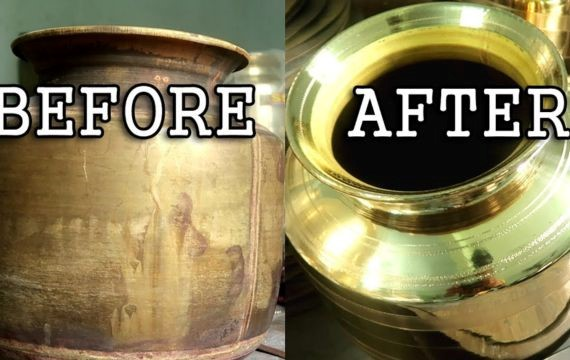
Before and after results of cleaning tarnished brass hardware using natural home methods.
How to Clean Heavily Tarnished and Corroded Brass
Sometimes, old brass that has been neglected for years needs more than a quick polish. If you are dealing with heavily corroded brass, deeply tarnished brass that has turned almost black, or items with stubborn black spots on brass, you will need to step up your approach. Here is how to tackle the most challenging restoration jobs.
Removing Heavy Tarnish: Step-by-Step
Initial Cleaning
Wipe down the item with a damp cloth and mild dish soap to remove surface grime, oils, and loose debris. Dry completely before proceeding.
Apply Acidic Paste
Mix equal parts white vinegar and table salt into a thick paste. Apply generously to all tarnished areas and work into crevices with a soft toothbrush.
Extended Soak (for small items)
For heavily tarnished brass small pieces, submerge in a bowl of hot water with half a cup of white vinegar and a tablespoon of salt for up to an hour.
Scrub and Repeat
Rinse, assess progress, and repeat the process if necessary. For badly tarnished brass, multiple applications may be required.
Final Polish
Once tarnish is removed, use a commercial brass polish or a small amount of baby oil on a soft cloth to buff the surface to a final brass shine.
Protective Coating
Apply a thin layer of clear lacquer, wax, or mineral oil to seal the surface and slow future tarnishing. This is especially important for restoring brass hardware in high-traffic areas.
How to Clean Brass That Has Turned Black
When brass turns nearly black, it indicates deep brass oxidation that has built up over a long period. To clean brass that has turned black, you will need a more aggressive acidic solution. Mix one part lemon juice with one part white vinegar and soak the item for 30 minutes to an hour. The combined acids work to dissolve even stubborn oxidation layers. For areas that are particularly resistant, apply a thick paste of salt and lemon juice and leave it on for several hours before scrubbing with a brass brush (not steel, which can scratch).
If home methods are not making a significant dent, this is when a commercial antique brass cleaner such as Brasso or Flitz becomes valuable. These products are specifically formulated with a balance of mild acids and abrasives to remove tarnish from brass without damaging the metal. Follow the product instructions carefully, and always test on a small, hidden area first.
How to Clean Corroded and Rusty Brass
True rust does not form on solid brass (rust is iron oxide, and brass contains no iron), but brass corrosion can look rust-like — especially if the piece contains impurities or has been exposed to certain chemicals. Rusted brass or heavily corroded pieces often benefit from a long soak in a solution of one part white vinegar to one part water, with a tablespoon of salt added. For extremely stubborn cases, a commercial product like Bar Keepers Friend, which contains oxalic acid, can be very effective at dissolving corrosion off brass. Apply it as a paste, leave for five to ten minutes, scrub gently, and rinse thoroughly.
How to Clean Vintage and Antique Brass
Cleaning vintage brass and genuine antiques requires a more delicate touch. The same acidic methods that work beautifully on modern brass hardware can strip a valuable patina or damage fragile old finishes. When you are working with antique brass, the first rule is to use the gentlest possible method and work up gradually only if needed.
Best Approach for Antique Brass Pieces
For cleaning antique brass, begin with warm, soapy water and a very soft cloth. Many pieces described as “heavily tarnished” simply need a thorough wash to remove decades of grime sitting on top of a perfectly intact patina. If gentle washing is not sufficient, a specialized antique brass cleaner or very diluted lemon juice solution (one part juice to four parts water) is the next step. Always rinse extremely well and dry immediately to prevent water spotting.
When it comes to restoring brass finish on vintage hardware, consider whether you want to preserve the aged look or restore brass to a like-new shine. Many interior designers and antique collectors deliberately retain the patina, as it tells the story of the piece. If restoration is the goal, gentle polishing compounds designed specifically for brass refinishing will give you a more controlled result than aggressive home remedies.
✨ Pro Tip After cleaning antique brass, apply a thin coat of Renaissance Wax (used by museum conservators worldwide) to protect the finish and maintain the natural look without adding artificial shine.
How to Clean Different Types of Brass Items
Different brass items require slightly different approaches based on their size, shape, and how they are used. Here is a practical breakdown of the most common items people want to clean brass on at home.
How to Clean Brass Hardware and Door Handles
Door handles, hinges, and other brass hardware are subjected to constant handling, which means they accumulate oils, salt from skin, and general grime rapidly. For cleaning tarnished brass hardware, mix equal parts white vinegar and water in a spray bottle, spritz onto the hardware, and wipe with a soft cloth. For more significant tarnish, use the lemon-and-salt method. After cleaning, polish with a commercial brass polisher and apply a thin layer of paste wax to protect against future tarnishing.
If you are trying to refinish brass hardware that is beyond simple cleaning — perhaps pieces that are heavily pitted or where the finish has worn unevenly — you may want to consider a professional brass refinishing service, or look into products designed for how to repair brass plating on items with a plated finish.
How to Clean Brass Furniture
Brass legs, accents, and drawer pulls on brass furniture can develop significant tarnish over time. The key challenge with furniture pieces is that they are often large, immovable, and may have lacquered finishes. Before cleaning, always test your chosen method on a small, inconspicuous area. For lacquered brass furniture, simply wipe down with warm soapy water — do not use acids or abrasives on lacquered surfaces, as these will damage the protective coating. For unlacquered brass furniture, the vinegar-salt paste method is effective, applied section by section and rinsed off carefully.
How to Clean Brass Figurines
Small brass figurines and decorative objects can be soaked directly in cleaning solutions, which makes them easier to treat than large, fixed items. Fill a bowl with warm water and a generous splash of white vinegar, add a pinch of salt, and submerge the figurine for 15–30 minutes. Use a soft toothbrush to work into carved details and crevices where tarnish tends to accumulate. Rinse thoroughly under running water and dry immediately with a soft cloth, then buff to a shine.
How to Clean Vintage Brass Hardware
Vintage brass hardware from old furniture, cabinetry, and fittings can be beautifully restored with patience. Remove the hardware from the furniture first if possible, then assess whether it is lacquered or unlacquered. Older pieces are often unlacquered, making them very responsive to the vinegar-and-salt paste method. After cleaning and drying, a light application of linseed oil or a commercial brass wax will help maintain the restored finish.
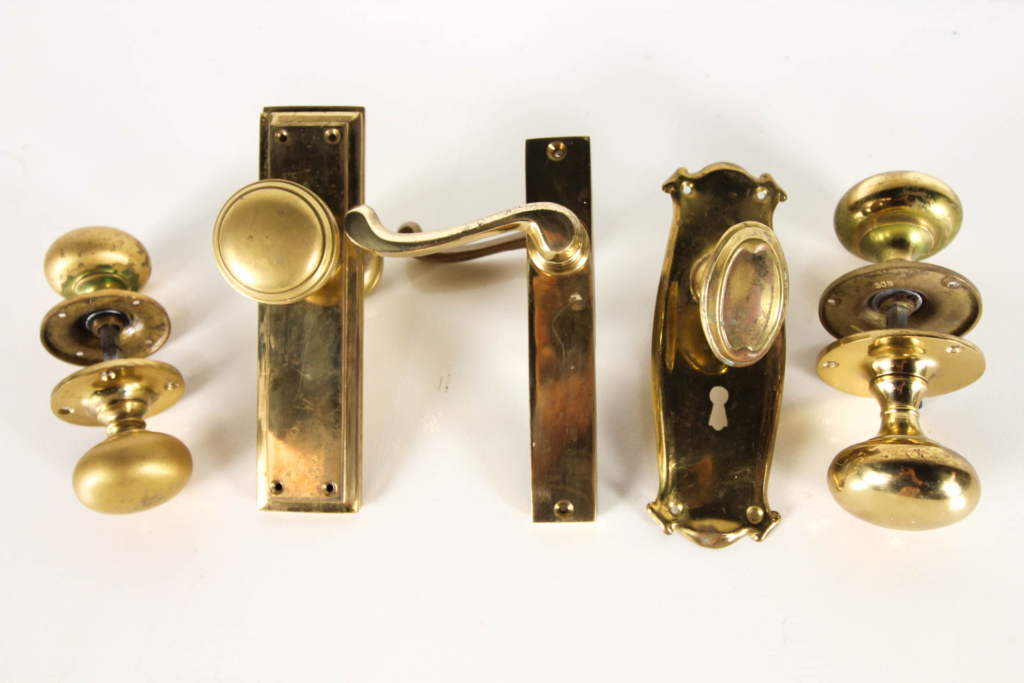
Restoring vintage and antique brass hardware is achievable at home with the right approach and a little patience.
Best Commercial Brass Cleaners and Polishes
While home remedies work excellently for most situations, there are times when a commercial product is the best way to clean tarnished brass — particularly for very heavy corrosion, professional-looking results, or when you are tackling a large number of items at once. Here is what to look for in the best brass cleaner for your needs.
Top Commercial Products for Brass Cleaning
⭐ Brasso Metal Polish
- Long-established, trusted brand
- Works on brass, copper, and chrome
- Effective for moderate to heavy tarnish
- Available in most hardware stores
⭐ Flitz Polish
- Excellent for antique brass cleaner needs
- Non-abrasive formula
- Safe for most metals and finishes
- Leaves a protective micro-coating
⭐ Bar Keepers Friend
- Oxalic acid formula cuts through corrosion
- Ideal for heavily corroded brass
- Use with caution on vintage pieces
- Excellent for cleaning antique brass hardware
⭐ Simichrome Polish
- Premium option for show pieces
- Particularly good for shining brass cases and jewelry
- Provides long-lasting protective layer
- Loved by firearms and hardware collectors
How to Care for Brass and Keep It Shining Longer
Knowing how to care for brass properly after cleaning is just as important as the cleaning itself. With the right maintenance habits, you can dramatically slow the rate of tarnishing and reduce how often you need to clean brass items from scratch. Here is how to keep that brass shine going strong.
Protecting Brass After Cleaning
Once you have done the work of restoring brass to a beautiful shine, the single most important step is sealing the surface to protect it from future oxidation. There are several options depending on your preference and the type of item.
- Clear lacquer spray: Applied in thin, even coats, clear lacquer creates a durable barrier against air and moisture. Ideal for decorative items you do not handle often.
- Renaissance Wax or Carnauba wax: A traditional choice for antiques and fine brass pieces, providing a natural-looking protective layer without the thickness of lacquer.
- Linseed oil or mineral oil: A light wipe-down with mineral oil after polishing works well for brass hardware that sees regular use, as it does not build up over time.
- Commercial brass protectants: Products like Eezox or Sentry Solutions provide long-lasting protection specifically designed for metal surfaces.
Routine Maintenance Tips
- Dust brass decorative items weekly with a soft, dry cloth to prevent grime buildup.
- Avoid touching brass items with bare hands when possible — oils from skin accelerate tarnishing.
- Keep brass items away from humid environments, salt air, and harsh chemicals.
- For brass hardware like doorknobs, a quick wipe with a lightly oiled cloth every few weeks prevents buildup significantly.
- Never use steel wool, abrasive scouring pads, or bleach-based cleaners on brass — these cause irreparable scratching and damage.
Brass Cleaning: Dos and Don’ts
| ✓ DO | ✗ DON’T |
|---|---|
| ✓ Test a small area before treating the whole piece | ✗ Use steel wool or harsh abrasive pads |
| ✓ Rinse thoroughly after acidic cleaning | ✗ Leave acid cleaners on the surface too long |
| ✓ Dry completely after every wash | ✗ Soak lacquered brass in any cleaning solution |
| ✓ Apply a protective wax or oil after polishing | ✗ Use bleach or ammonia-based cleaners |
| ✓ Use soft cloths and natural-bristle brushes | ✗ Scrub brass-plated items aggressively |
| ✓ Consult a professional for high-value antiques | ✗ Assume all dark brass needs aggressive cleaning |
How to Restore Brass Finish: Advanced Techniques
For pieces that go beyond routine cleaning and require true brass restoration, there are a few more advanced approaches worth knowing. Whether you are dealing with deeply pitted surfaces, uneven worn brass, or trying to understand how to restore brass plating on decorative items, these techniques give you more control over the final result.
Brass Refinishing Using Electrolytic Cleaning
Electrolytic cleaning is a technique borrowed from professional metal restoration and uses a small electrical current to reverse the oxidation process on the brass surface. While it sounds complex, a basic setup requires only a plastic tub, water, washing soda (sodium carbonate), a 12-volt battery charger, and a piece of sacrificial steel. The corroded brass is connected to the negative terminal, the steel to the positive, and the current causes the oxide layer to effectively dissolve and transfer to the sacrificial metal. This method is particularly effective for cleaning heavily corroded brass items where other methods have failed.
How to Remove Patina from Brass
Removing patina from brass (or removing tarnish from brass that has been deliberately aged) is sometimes desirable when you want a bright, modern look on an otherwise aged piece. The vinegar-salt paste method described earlier is excellent for this purpose. For thicker, deliberately applied patinas sometimes found on old brass decorator pieces, a commercial tarnish remover for brass will give more consistent results. Always remember that once you remove patina from brass, it will begin developing a natural one again over time — this is not a flaw, but simply the nature of the metal.
How to Restore Brass-Plated Metal
When you are dealing with brass-plated metal that has worn through, the underlying options are limited. Light cleaning with non-abrasive methods can clean the remaining brass without worsening the damage. For complete re-plating, professional electroplating services are the only truly effective solution. However, if the piece is decorative and you simply want to improve its appearance, applying a brass-tinted metallic paint or a specialist brass restoration product can create a convincing and durable result.
Frequently Asked Questions About Cleaning Brass
What is the best way to clean old brass that has turned very dark?
The best way to clean old brass that has darkened significantly is a prolonged soak in a white vinegar and salt solution, followed by gentle scrubbing with a soft brush. For extremely dark or heavily tarnished brass, a commercial cleaner like Brasso or Bar Keepers Friend applied as a paste and left for ten minutes before rinsing will produce excellent results. Always rinse and dry thoroughly afterward.
Can I use toothpaste to clean brass?
Yes, you can use toothpaste to clean brass — specifically plain white toothpaste, not gel or whitening varieties. The mild abrasives in regular toothpaste are effective at polishing away light to moderate tarnish on brass figurines, small hardware, and jewelry. Apply with a soft cloth or toothbrush, rub in circles, rinse, and buff dry.
How do I know if my brass is lacquered?
Lacquered brass often looks cleaner and more evenly shiny than unlacquered brass. A simple test: if your brass item still looks very shiny even in areas that should tarnish quickly (like a doorknob), it is likely lacquered. Lacquered brass should only be cleaned with warm soapy water — never use acids or abrasive pastes, as they will damage the lacquer and cause uneven spots.
How do you get rid of green spots on brass?
Green spots on brass are caused by copper carbonate — a more advanced form of brass oxidation. To remove them, apply a paste of equal parts white vinegar and baking soda directly to the spots and leave for 15–20 minutes. The mild acid-base reaction will help lift the green deposits. For stubborn spots, a commercial antique brass cleaner with oxalic acid works very effectively. Always rinse thoroughly and dry after treatment.
How often should I clean my brass items?
How often you need to clean brass items depends on the environment and use. Decorative brass in dry indoor environments may only need cleaning once or twice a year. Brass hardware like door handles benefits from a monthly wipe-down to prevent buildup. Items near the coast or in humid climates will tarnish faster and may need more frequent attention. Applying a protective wax or lacquer after each cleaning significantly extends the interval between cleanings.
What is the fastest way to make brass shiny again?
The fastest way to make brass shiny again for most pieces is the lemon-and-salt method: cut a lemon in half, dip in salt, and rub directly onto the tarnished surface. This takes only a few minutes and produces almost instant results on light to moderate tarnished brass. For speed with heavier tarnish, a commercial brass polisher like Brasso applied with a cloth and buffed off is the quickest route to a brilliant shine.
Is it safe to clean antique brass at home?
Cleaning antique brass at home is generally safe if you use gentle methods and work carefully. Always start with the mildest approach — warm soapy water — and only escalate if necessary. For pieces of significant monetary or historical value, consult a professional conservator first. The main risk with antiques is removing a naturally formed patina that actually adds value to the piece, so err on the side of caution.
Why does my brass keep tarnishing so quickly after cleaning?
Brass that tarnishes very quickly after cleaning usually needs a protective coating applied after polishing. Without sealing, the freshly exposed copper in the alloy reacts with air almost immediately. Apply a thin layer of clear lacquer, carnauba wax, or Renaissance Wax after your next clean, and the interval before tarnish returns will increase dramatically. Also ensure you are rinsing off all acid residue after cleaning, as leftover acid accelerates oxidation.
What is the difference between restoring brass and refinishing brass?
Restoring brass typically refers to cleaning, polishing, and bringing a tarnished piece back to good condition using cleaning methods and polishes. Brass refinishing goes further — it may involve stripping the surface entirely, re-plating, applying new coatings, or using electrochemical processes to create an entirely new surface finish. Most home situations only require restoration; refinishing is reserved for heavily damaged, worn-through, or professionally serviced pieces.
Conclusion: Bring the Beauty Back to Your Brass
Brass is one of those materials that rewards a little attention with extraordinary beauty. Whether you are working on a set of tarnished brass drawer pulls, a family heirloom candlestick, or a set of vintage brass hardware you found at an antique market, the knowledge of how to clean brass items properly is genuinely empowering. You do not need expensive professional services or harsh industrial chemicals — the combination of patience, the right acidic solution, and a little elbow grease will restore brass to a shine that surprises even seasoned collectors.
The key lessons to take away: always identify whether your item is solid brass or plated before choosing a cleaning method; start with the gentlest approach and only escalate if needed; rinse thoroughly and dry immediately after every cleaning; and protect your work with a coat of wax or lacquer to keep that brass shine going strong for as long as possible. Whether your goal is a quick shine-up for daily pieces or a thorough brass restoration project for a cherished antique, you now have everything you need to do it confidently and well.
Remember — the warm, golden glow of well-maintained brass is not just aesthetically pleasing, it is a testament to the care and character you bring to your home. With the right techniques at your fingertips, there is no piece of old brass too far gone to bring brass back to life.