ARTICLE AT A GLANCE
Everything you need to know about rub n buff — what it is, how it works, step-by-step application on wood, metal, and plastic, color options, dry times, and pro tips for flawless results
There’s something almost magical about transforming a dull, outdated piece into something that looks like genuine aged gold or polished silver — and it takes about five minutes. If you’ve ever wondered how to use rub n buff to achieve those gorgeous metallic finishes you keep seeing on thrift-store flips and home décor projects, you’re in exactly the right place.
Rub n buff has been a quiet secret among crafters, furniture restorers, and DIY enthusiasts for decades. It’s the kind of product that seems almost too simple to work — a tiny tube of wax-based metallic paste that you apply with your fingertip — yet the results consistently look stunning. Whether you’re gilding a picture frame, refreshing a door knob, or adding antique character to a wooden sculpture, knowing how to use rub and buff correctly makes all the difference between a professional finish and a streaky mess.
In this guide, we’re covering everything: rub n buff instructions, tips for every surface type, the full range of rub n buff colors, realistic rub n buff before and after comparisons, dry times, and honest answers to the questions that trip beginners up. Let’s dive in.
What Is Rub n Buff and How Does It Work?
Before picking up the tube, it helps to understand what you’re actually working with. What is rub n buff? At its core, it’s a blend of carnauba wax, fine metallic powders, and pigments manufactured by AMACO (American Art Clay Company). The product has been on the market since the 1970s, and its longevity speaks to how well it delivers on its promise.
How does rub n buff work? The wax acts as a carrier and binder, while the metallic powder pigments sit within it. When you rub the paste onto a surface and buff it with gentle pressure, the metallic particles bond to the base coat beneath, leaving behind a thin, lustrous layer of color. The carnauba wax also provides a degree of protection once it cures, which is why the finish looks polished rather than powdery.
How does rub and buff work differently from metallic paint? Traditional metallic paint sits on top of a surface in a wet film that dries opaque. Rub and buff, by contrast, is translucent and wax-based — it can be layered subtly, blended at the edges, and buffed to varying levels of sheen. This gives it an organic, hand-applied quality that no spray paint can replicate.
The Science Behind the Shine
The metallic pigments in rub n buff are extremely fine — measured in microns — which is why the finish looks smooth rather than gritty. When you apply the paste, the friction of rubbing distributes these particles evenly while simultaneously warming the wax slightly, helping it grip the surface. Buffing then compresses the metallic layer, which is what produces that characteristic gleam. You’re essentially burnishing metal pigment directly onto whatever you’re working on.
This is also why surface prep matters. A smooth, clean base gives those metallic particles a consistent foundation to adhere to. A rough, dusty, or greasy surface will produce an uneven result — something we’ll address in detail in the application section below.
Rub n Buff Colors: Choosing the Right Shade
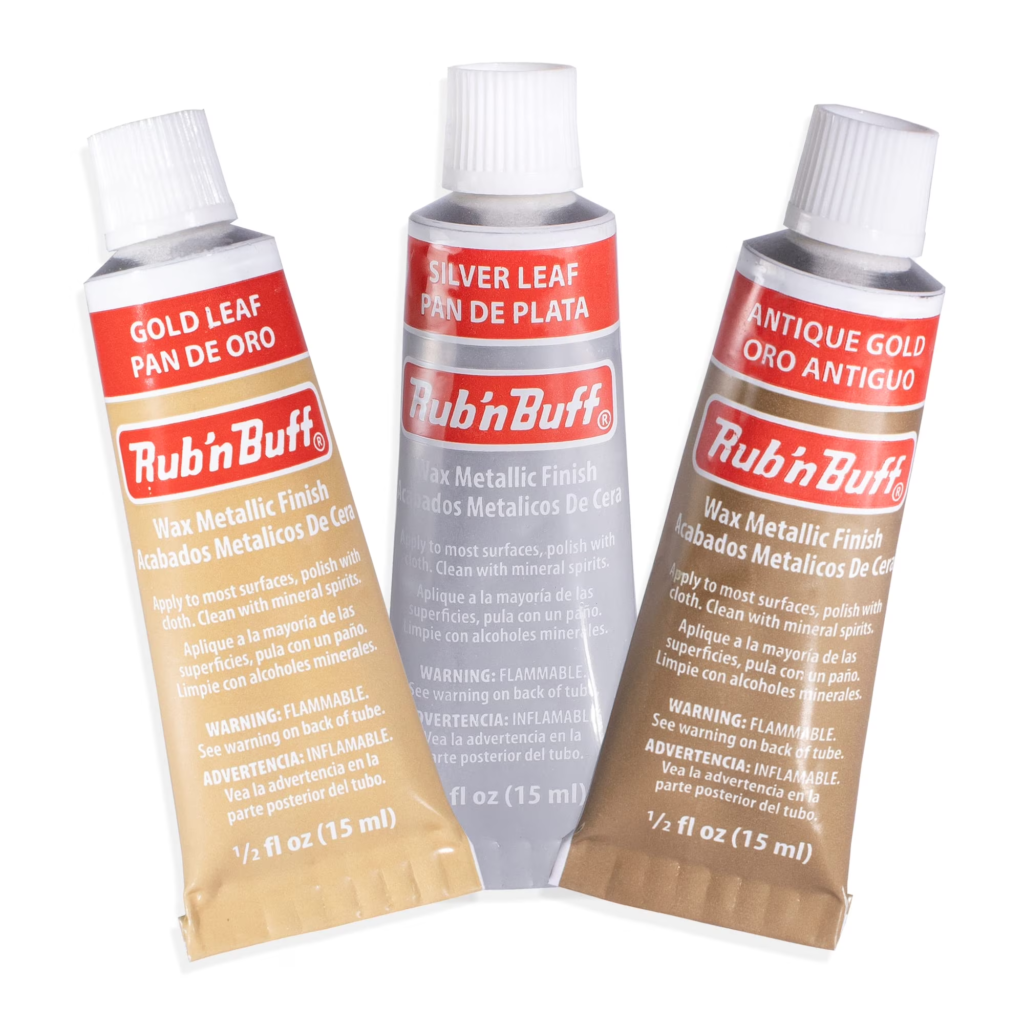
One of the first questions people ask when they discover this product is: what rub n buff colors are available? AMACO offers over 18 shades, which is genuinely impressive for a wax metallic finish. Understanding the options helps you pick the right match for your project’s aesthetic.
The Full Palette
| Gold Leaf | Antique Gold | Silver | Copper | Bronze |
| Ebony | Pewter | Antique Bronze | Turquoise | Sapphire Blue |
The most popular shades by far are antique gold rub n buff (also called rub and buff antique gold), gold rub and buff / rub n buff gold leaf, and silver rub and buff. For darker, moodier projects, rub n buff black (Ebony) and ebony rub and buff are go-to choices — particularly stunning on carved wood and decorative architectural pieces.
Gold Rub and Buff: Which Gold Finish Should You Choose?
The difference between antique gold rub n buff and rub n buff gold leaf comes down to warmth and brightness. Antique Gold has a slightly muted, amber-toned warmth — it looks aged, heritage, and rich. Gold Leaf, by contrast, is brighter and more saturated, mimicking the look of genuine gold leaf gilding. If your project needs to look genuinely old, reach for Antique Gold. If you want maximum visual impact and shine, Gold Leaf is your answer.
For metal-specific projects, black rub and buff on metal using the Ebony shade creates a dramatic blackened-iron effect that works beautifully on door hardware and lamp bases.
How to Apply Rub n Buff: What You Need Before You Start
Getting the right result starts before you open the tube. Gathering your materials and prepping your surface properly is the single biggest factor separating a professional-looking finish from a disappointing one.
Materials Checklist
- Rub n buff in your chosen shade (available at most craft stores; if looking for rub n buff near me, check Hobby Lobby, Michaels, or Jo-Ann. Rub n buff home depot carries it in select locations; rub n buff target occasionally stocks it too)
- Fine-grit sandpaper (220 grit) for smoothing the surface if needed
- Tack cloth or lint-free rag for cleaning
- Latex gloves (the metallic pigments stain skin and are hard to remove)
- Old toothbrush or stiff-bristle brush for recessed areas
- Soft buffing cloth — microfiber works exceptionally well
- Optional: a clear matte or satin sealer for high-traffic surfaces
💡 PRO TIP
Less is always more with rub n buff. A common mistake is squeezing out too much product. Start with a pea-sized amount — you can add more, but you can’t easily remove excess wax that has already bonded to the surface.
Surface Preparation: The Step Most People Skip
If your surface is dusty, greasy, or peeling, rub and buff will not adhere properly. Wipe the piece down thoroughly with a tack cloth. If there are glossy areas that won’t accept the wax, a very light scuff with 320-grit sandpaper gives the surface micro-texture to grip. For previously painted surfaces, make sure the existing paint is fully cured and bonded — loose or flaking paint will cause the wax to lift.
How to Use Rub n Buff: Complete Step-by-Step Instructions
Now we get to the heart of it. Whether you’ve read a dozen rub n buff tutorials before or this is your very first time, these rub n buff directions will walk you through the process in a clear, logical sequence. The method is the same whether you’re working on wood, metal, or plastic — with a few surface-specific adjustments we’ll address after.
| Step | Step 1 | Step 2 | Step 3 | Step 4 | Step 5 |
| Process: | Clean & prep surface | Apply tiny amount with fingertip | Work in circles, build layers | Buff with soft cloth for shine | Seal (optional) once dry |
Infographic — The 5-step rub n buff application process. Following these steps guarantees a clean, even metallic finish every time.
Step 1 — Open the Tube and Squeeze Out a Tiny Amount
The tube nozzle on most rub n buff products is small by design — this is intentional, because a tiny amount covers a surprisingly large area. Squeeze out roughly the size of a small pea onto the tip of your index finger, or onto a soft cloth. Wearing gloves at this stage will save you from spending the next hour scrubbing gold pigment off your fingernails.
Step 2 — Apply with Your Fingertip Using Circular Motions
The best way to apply rub n buff is directly with your bare fingertip (or gloved fingertip). Your body heat gently softens the wax just enough to help it spread smoothly. Work in small circular motions, covering a 4–6 inch section at a time. Don’t press too hard — a light, consistent pressure is all you need. The paste will look uneven and slightly streaky at this stage; that’s completely normal and expected.
Step 3 — Build Layers for More Intensity
One of the best things about using rub n buff is that it’s completely buildable. If you want a subtle metallic highlight, one thin layer is enough. If you want a richer, more opaque finish, wait for the first layer to begin setting (about 5 minutes), then apply a second. You can also strategically layer different shades — for instance, applying rub and buff antique gold as a base and adding a touch of silver rub and buff on raised edges creates a beautifully nuanced patina effect.
Step 4 — Buff to a Shine
This is the step that transforms the product from a dull paste into a gleaming metallic finish. Using a clean, dry microfiber cloth (or an old T-shirt works fine), buff the surface using firm, quick circular strokes. You’ll see the metallic particles come alive as you work — the more you buff, the higher the sheen. This is also how you buff rub n buff to control your finish: fewer passes = softer satin finish; more vigorous buffing = near-mirror metallic gleam.
For recessed carvings or detailed areas that your cloth can’t reach, use a dry toothbrush to buff into crevices. This actually produces a gorgeous effect in carved wood where the recessed areas stay slightly darker and the raised edges shine — exactly the look of aged gilt.
Step 5 — Optional Sealing
For decorative pieces that won’t see much handling, no sealer is needed. However, if you’re applying rub and buff to a high-traffic surface like a door handle, stair railing, or picture frame that gets touched regularly, a light coat of clear matte or satin sealer will protect the finish significantly. Avoid gloss sealers — they can interfere with the metallic look.

How to Use Rub n Buff on Wood
Wood is arguably the most popular surface for this product, and for good reason — the natural grain of wood interacts beautifully with metallic wax, creating organic variation you simply can’t replicate with paint. Rub n buff on wood is also very forgiving since the natural texture of wood grips the wax well.
Prepping Bare vs. Painted Wood
For bare wood, lightly sand to 220 grit and remove all dust. Apply a thin base coat of dark paint (black or dark brown) and let it fully cure. This base coat dramatically improves the final result — the metallic wax sits on top and the dark base peeks through in the grain lines, creating instant depth and age. This technique is the backbone of most rub n buff on wood tutorials you’ll find online.
Can you use rub n buff on wood without a base coat? Yes, technically — but on raw wood, the wax may absorb unevenly and look splotchy. The base coat step is well worth the extra 30 minutes. When following proper rub n buff instructions, this prep step is usually listed as essential for wood specifically.
For gold rub and buff on wood specifically, the combination of a black base coat and Antique Gold wax creates one of the most convincing faux-gilt finishes imaginable. It’s a technique used by professional prop builders and furniture restorers alike.
How to use rub n buff on wood in summary: sand → clean → dark base coat → apply rub n buff → build layers → buff vigorously → seal if needed.
How to Use Rub and Buff on Metal
Metal presents different challenges than wood — the surface is non-porous, so the wax bonds through mechanical adhesion rather than absorption. This means surface prep is even more important. Rub and buff on metal produces absolutely stunning results when done correctly, particularly on cast iron, architectural hardware, and decorative metal objects.
Cleaning and Priming Metal Surfaces
Start by degreasing the metal thoroughly with isopropyl alcohol. Any oil, rust, or loose paint must be removed. For rusted metal, sand back to clean metal and wipe again. If the metal is bare and shiny (like polished chrome), scuff it with fine steel wool first so the wax has texture to grip.
How to use rub n buff on metal: a thin base coat of primer isn’t always necessary, but it helps enormously on smooth metals. For rub and buff on metal in the Ebony shade, a flat black base coat applied first makes the final finish look like genuine blackened cast iron.
Applying Rub n Buff to Metal Hardware
Door knobs, drawer pulls, light switch covers, curtain rods, lamp bases — all of these are ideal candidates for rub n buff application on metal. Work the wax paste into any engraving or texture with your fingertip, let it set briefly, then buff with a microfiber cloth. On convex hardware like knobs, use a circular cloth motion around the entire piece.
How to Use Rub n Buff on Plastic
Plastic is a trickier surface, but absolutely workable. The main challenge is that smooth plastic has almost nothing for the wax to grip. How to use rub n buff on plastic successfully comes down entirely to preparation. Scuff the plastic lightly with 400-grit sandpaper, clean it, then apply a thin layer of spray primer designed for plastic. Once the primer is fully cured, the rub n buff application process is identical to the wood method.
Plastic frames, resin figurines, foam cosplay props, and plastic moldings all respond beautifully to this process. The rub n buff before and after transformation on cheap plastic pieces is especially dramatic — what looked like a $2 dollar-store frame can genuinely look like antiqued silver or gold after proper treatment.
Rub n Buff Dry Time: How Long Does It Take?
This is one of the most commonly asked practical questions, so let’s be specific. How long does rub n buff take to dry? The initial set time — where the wax goes from wet-feeling to tacky-free — is approximately 15–30 minutes under normal room temperature conditions (68–72°F). However, “dry” and “cured” are two different things.
Understanding Set Time vs. Cure Time
How long does it take rub n buff to dry in a functional sense? The wax is dry enough to buff after about 10–15 minutes. It’s dry enough to handle without smearing after 20–30 minutes. Full cure — where the carnauba wax has fully hardened and the finish has maximum durability — takes approximately 24 hours. Rub n buff dry time can be longer in humid conditions or if you’ve applied a particularly thick layer.
For those wondering how long does rub and buff take to dry before sealing: wait at least 24 hours before applying any topcoat sealer. Sealing over uncured wax traps moisture and can cloud the finish.
⏱ DRY TIME SUMMARY
Touch dry: 15–30 min | Buff-ready: 10–15 min | Handle-safe: 30 min | Full cure: 24 hours
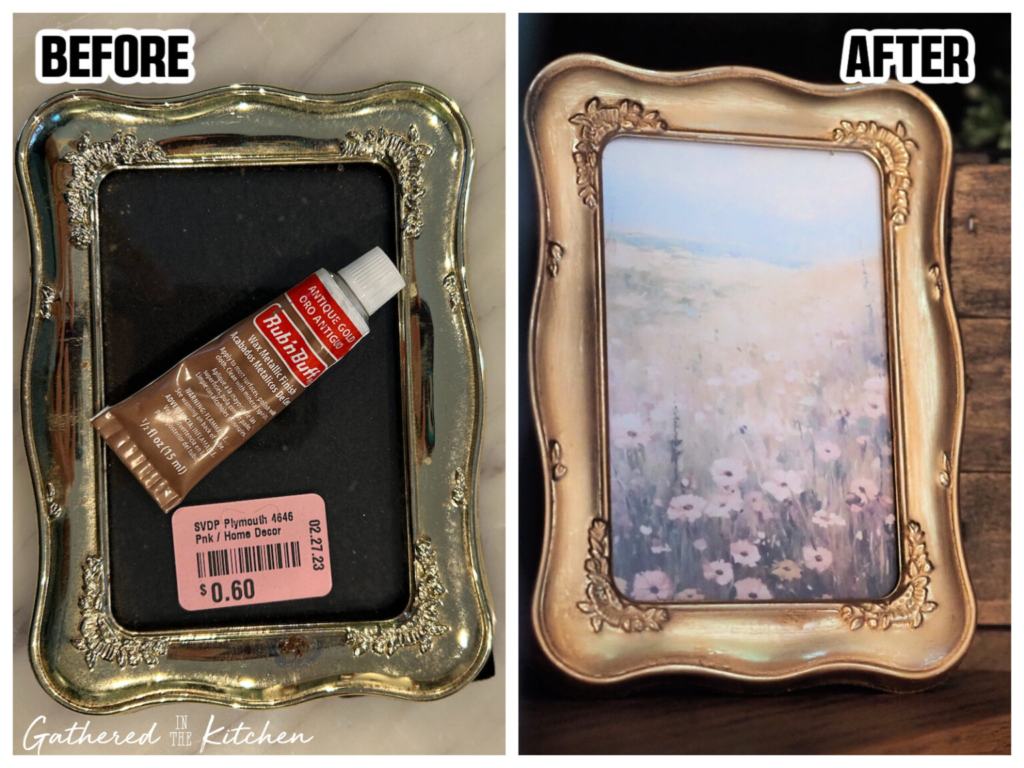
Rub n Buff Before and After: Real Project Results
Nothing illustrates the power of this product better than honest comparisons. Here’s a quick reference of common projects and their typical rub n buff before and after outcomes:
| Surface / Item | Shade Used | Before | After |
| Ornate picture frame (wood) | Antique Gold | Flat brown paint | Rich gilded appearance |
| Old brass door knob | Ebony (Black) | Dated shiny brass | Matte black iron look |
| Plastic resin figurine | Gold Leaf | Cheap-looking white plastic | Striking gold statue effect |
| Cast iron candle holder | Silver | Rusty, dull surface | Polished pewter aesthetic |
| MDF shadow box frame | Bronze | Raw, unfinished MDF | Warm antique bronze glow |
These rub n buff before and after outcomes are typical when surface prep is done properly and the right shade is chosen. The results consistently outperform what you’d expect from a product that costs under $10 per tube.
Common Mistakes and How to Fix Them
Even with the best rub n buff instructions, beginners make predictable mistakes. Here are the most frequent issues and their solutions:
- Too much product applied at once: The finish looks thick, gloopy, and uneven. Solution: use a cloth dampened lightly with mineral spirits to remove excess before it fully cures, then start again with a smaller amount.
- Streaky appearance: Usually caused by applying to a surface that wasn’t clean enough, or by not buffing sufficiently. Buff again more vigorously — often this is all it takes.
- Wax not adhering: The surface was too smooth or greasy. Lightly scuff with fine sandpaper and clean again before reapplying.
- Finish looks dull after sealing: A gloss topcoat was used, or sealer was applied before the wax was fully cured. Use matte/satin sealer only, and wait the full 24-hour cure period.
- Uneven color in carved details: Use a toothbrush to work wax into recesses, then buff only the raised surfaces with a cloth to create dimensional contrast.
Does Rub and Buff Come Off?
Does rub and buff come off once applied? Over time on high-friction surfaces, yes — which is why sealing is recommended for functional pieces. On decorative objects, a properly buffed and cured finish is surprisingly durable. If you need to remove it, a cloth soaked in mineral spirits or naphtha will dissolve the carnauba wax. This also makes rub n buff very forgiving to experiment with — if you don’t like the result, it’s reversible.
“Rub n buff isn’t just a paint — it’s a conversation between your hands and the material. Every surface tells a different story.”
Creative Rub n Buff Projects and Ideas
The versatility of rub n buff projects is genuinely impressive. Once you understand how to apply rub and buff on different surfaces, the creative possibilities expand rapidly. Here are project categories where the product consistently delivers remarkable results:
Home Décor Transformations
- Refreshing ornate picture frames with antique gold rub n buff or rub n buff gold leaf
- Updating cabinet hardware — drawer pulls, knobs, hinges — using rub and buff antique gold or Ebony
- Giving ceiling medallions, crown molding details, and corbels a gilded appearance
- Transforming thrifted candlesticks, vases, and decorative bowls with metallic finishes
Furniture Restoration
- Highlighting carved details on antique-style furniture using gold rub and buff
- Creating a blackened-iron look on table legs and metal accents with Ebony
- Adding bronze or copper tones to industrial-style furniture pieces
Cosplay and Props
- Weathering foam armor and prop weapons with layered metallic shades
- Creating realistic-looking aged metal on theatrical and costume pieces
- Finishing 3D-printed props with a professional metallic appearance
Frequently Asked Questions About Rub n Buff
How do you use rub and buff for the first time?
Start by cleaning your surface thoroughly and applying a dark base coat if working on wood or plastic. Squeeze a pea-sized amount of rub n buff onto your gloved fingertip. Apply with small circular motions, building thin layers. After 10–15 minutes, buff vigorously with a microfiber cloth until the metallic finish shines.
Where can I find rub n buff near me?
Most major craft retailers carry rub n buff. Hobby Lobby, Michaels, and Jo-Ann Fabrics typically stock the full color range. Rub n buff home depot availability varies by location — call ahead. Rub n buff target is occasionally stocked in the craft section of larger stores.
What is the best way to apply rub n buff on wood?
The best way to apply rub n buff on wood is: sand smooth, apply a dark base coat, let it fully cure, then apply thin layers of rub n buff with your fingertip using circular motions. Build up coverage gradually and buff between layers.
How long does rub n buff take to dry completely?
How long does it take rub n buff to dry depends on conditions: touch-dry typically takes 15–30 minutes, while full cure takes approximately 24 hours. Rub n buff dry time can be extended in humid conditions.
Can you use rub n buff on plastic without primer?
Technically yes, but adhesion will be poor on smooth plastic. For best results with how to use rub n buff on plastic, lightly scuff the plastic with 400-grit sandpaper and apply a plastic-specific spray primer first.
What’s the difference between antique gold and gold leaf shades?
Rub and buff antique gold is a warm, amber-toned shade designed to look aged and patinated. Rub n buff gold leaf is brighter and closer to genuine gold leaf gilding. Choose Antique Gold for vintage aesthetics; choose Gold Leaf for bright opulence.
Does rub and buff come off naturally over time?
Does rub and buff come off naturally? On high-friction surfaces without sealing, yes — it will show wear over time. Seal with a matte/satin topcoat after the full 24-hour cure period for durability. To remove intentionally, mineral spirits dissolves the carnauba wax cleanly.
How do you apply rub n buff to get an antique finish?
Apply a rub and buff shade like Antique Gold or Bronze over a black base coat. Apply sparingly and leave darker tones in recesses by buffing only the raised edges. Layer two complementary shades (e.g., antique gold rub n buff over Bronze) for the most convincing aged patina.
| Final Thoughts: Your Next Project Starts Now Few products offer this much creative power for such a small investment. Once you truly understand how to use rub n buff, you’ll start looking at everything differently — that plain wooden frame, the dated brass fixtures, the cheap plastic vase — and seeing potential metallic transformations everywhere. The fundamentals are simple: prep the surface properly, apply thin layers with your fingertip, build coverage gradually, and buff enthusiastically. Master those four steps and the rest — choosing between rub n buff gold and silver, deciding when to seal, learning to layer colors for depth — becomes intuitive with every project you complete. The product’s enduring popularity isn’t an accident. Rub n buff has outlasted dozens of competing products because it genuinely works, it’s accessible, and it produces results that look hand-crafted rather than painted. Start with a single piece — apply what you’ve learned from these rub n buff directions, and let the results speak for themselves. |